The thermit® welding process is the result of fusion created by a chemical reaction that occurs due to the difference of free energy between aluminum and metal oxide.
This difference produces enough heat to produce liquid steel or any other metal and allow without applying outside energy.
It occurs without or with the application of pressure. The use of a filler metal is optional.
All components for the aluminothermic process are used as powders or granules.
Once the reaction is initiated by an external heat source, the aluminum reduces the oxygen from the metal-oxide, which will result in a liquid superheated aluminum-oxide (Al(2)O(3).
Since these two components are different in density, they separate automatically and the liquid metal can be used for the production of alloys, special metals or for multiple welding applications. (see video below)
The process was discovered by Hans Goldschmidt in 1898. Since the turn of the century, the thermit process has been used to join train rails as well as other applications in the transit industry.
Example of Thermit Welding
Key Definitions:
- Crucible: the thermit chemical reaction takes place in a vessel called a crucible
- Mixture: A mixture of finely divided aluminum, metal oxide with the addition of any required alloying metals
- Mold: This is a mold that is formed around parts that need to be welded. The mode receives the molten metal.
- Reaction: The chemical reaction between aluminum and metal oxide. The reaction produces an aluminum oxide slag and superheated molten metal.
Material
Thermit material is a mechanical mixture of metallic aluminum and processed iron oxide.
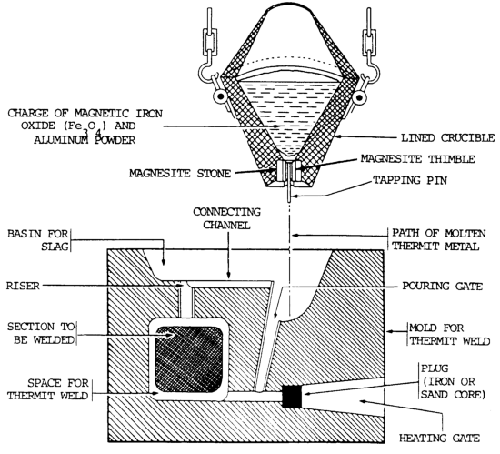
Molten steel is produced by the thermit reaction in a magnesite-lined crucible.
At the bottom of the crucible, a magnesite stone is burned, into which a magnesite stone thimble is fitted.
This thimble provides a passage through which the molten steel is discharged into the mold.
The hole through the thimble is plugged with a tapping pin, which is covered with a fire-resistant washer and refractory sand.
The crucible is charged by placing the correct quantity of thoroughly mixed thermit material in it.
Process
In preparing the joint for thermit welding, the parts to be welded must be cleaned, aligned, and held firmly in place.
If necessary, metal is removed from the joint to permit a free flow of the thermit metal into the joint.
A wax pattern is then made around the joint in the size and shape of the intended weld.
A mold made of refractory sand is built around the wax pattern and joint to hold the molten metal after it is poured.
The sand mold is then heated to melt out the wax and dry the mold. The mold should be properly vented to permit the escape of gases and to allow the proper distribution of the thermit metal at the joint.
A thermit welding crucible and mold is shown in figure 5-41 below.
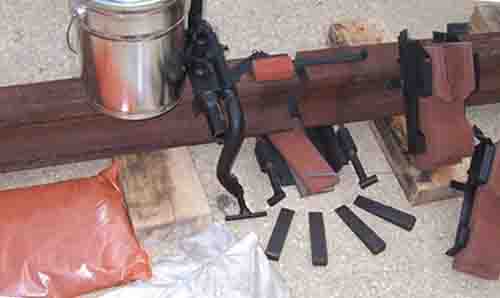
Welding Process for Rail: (see video above)
- Prepare rail to be welded
- Set the weld gap
- Clamp
- Apply molds
- Place Thermit portion into the crucible
- Preheat ends of the rails
- Ignite and pour steel
- Demolding
- Shear excess head metal
- Rough grinding
- Final grinding
Thermit Welding Mold & Crucible Diagram

Thermit Welding Process Animation Video
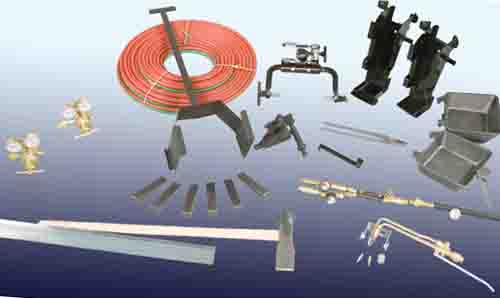
Thermit Welding Kits

Kits can vary based on the required welding process:
- Inch SKV Process: Common approach for joining two train rails
- 1.5 Inch SKV Process: new process that reduces the risk of internal inclusions.
- 2.75 Inch Wide Gap Weld: Used when replacing a defective flashbutt or Thermit weld.
- Full Head Repair Weld: Used to fill in after a damaged area at the rail head is removed.

yes. Thermite is readily available and easy to use and costs about $10.00 a pound. You have to use a high temperature igniter such as large “sparklers” or magnesium ribbon. Cannon or fireworks fuses WILL NOT work. Generally, arc welding in the “home shop” is easier and less costly for most jobs but every now and then thermite is handy. Check out youtube for videos and be aware- this stuff is nasty hot and lots of sparks. VERY dangerous but with good caution can do things in a handful of seconds that stick welding would take hours to do.
Being a retired railroad employee involved in thermite welding for many years. I have worked for Canadian National Railways in a variety of different positions from track inspector to thermite welder! I’ve worked in places where the only way in or out is by rail. Carrying bulky equipment in and out is not an option so thermite kits are a necessity! Caution thermite welds are extremely hot and you can be burned very easily. Be careful!