Flux core welding (FCAW) is much easier to learn and master than stick (SMAW) or TIG welding (GTAW), but it can present many challenges for beginner welders.
These tips and tricks have been hand-picked to help you on your way to mastering flux core welding.
Always remember that, above all else, practice will make the best progress.
1. Clean Your Metal Properly
The flux inside of the flux core wire contains many elements that will help to de-oxify and remove contaminants from the weld metal.

© weldguru.com – Image usage rights
Flux core can be much more forgiving of sub-par material conditions than MIG or TIG welding.
This does not mean you should be slacking off when preparing the base metals.
Always clean the base metals regardless of the welding process that you’re using.
Grind off the mill scale, blow off any dust, and thoroughly clean with a solvent that doesn’t leave any residue.
Failing to clean the base metals will result in weld defects such as porosity or lack of fusion.
2. Use the Correct Flux Core Wire
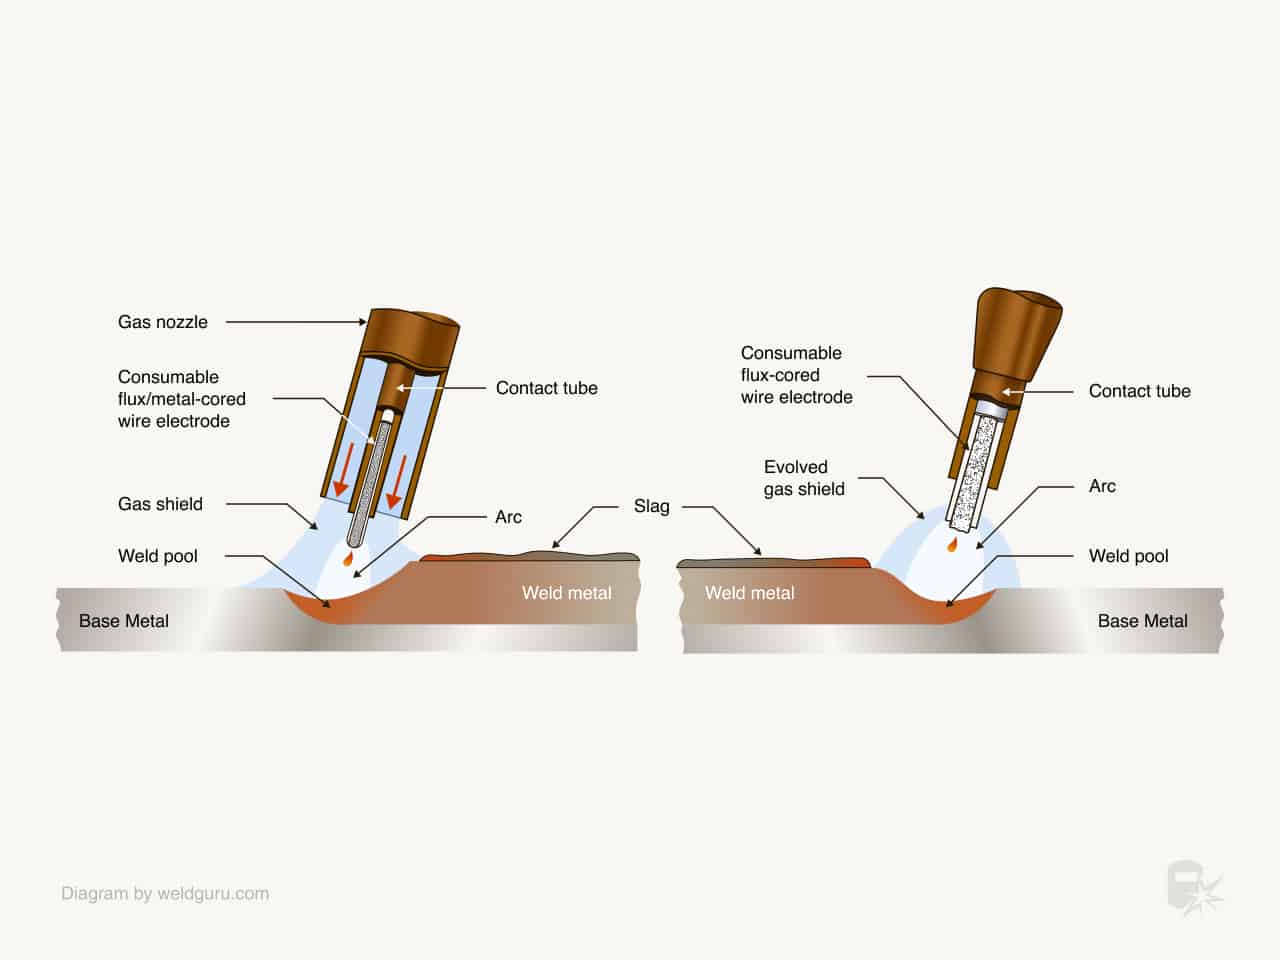
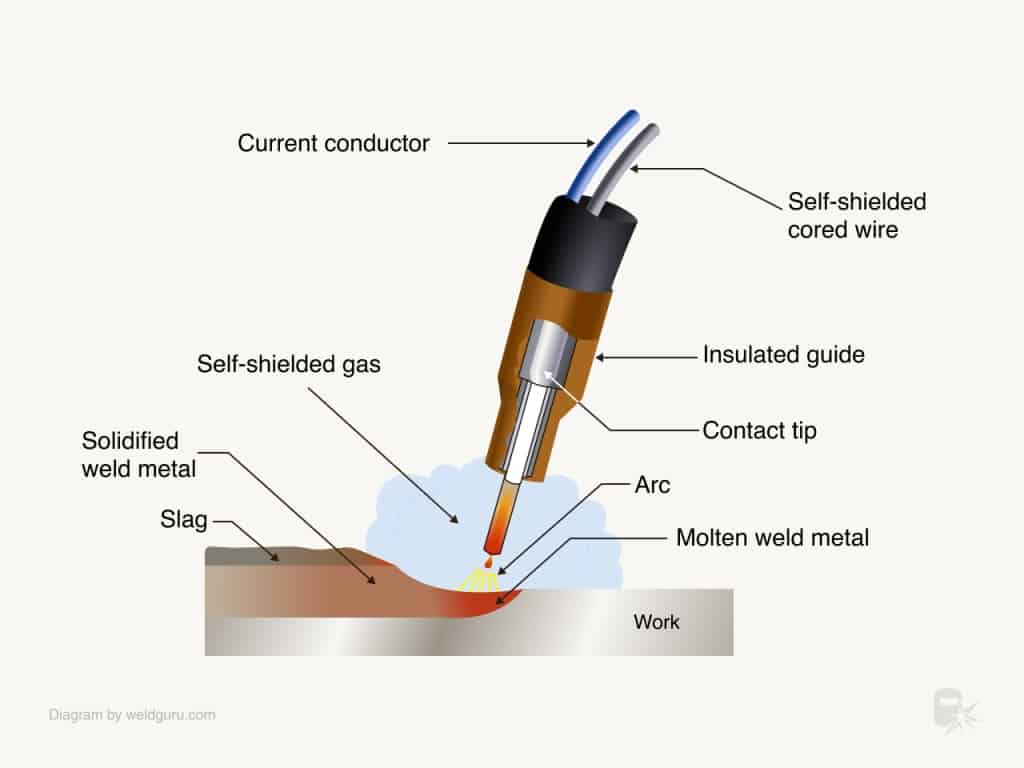
Flux core wire falls into two broad categories: dual shielding and self-shielding.
- Dual-shielding wire needs an external shielding gas source to protect the weld from the atmosphere.
- Self-shielding wire doesn’t need an external shielding gas.
Self-shielding wire is great for outdoor use because the flux does a good job resisting the wind. The downside is that the welds will not be as nice as those with dual-shielding wire.
You can only use dual-shielding wire indoors, but it also produces better and nicer-looking welds.
© weldguru.com – Image usage rights
Wire size is a big consideration as well. Flux core wire comes in diameters as small as 0.030” but as large as 5/64”. The larger the wire, the more voltage and amperage you’ll need to run the wire.
A small 120/220-volt wire feed machine will be the most common and logical choice for hobbyists or DIYers. If you have one of these smaller machines, you’ll be running small-diameter wires.
Your choice in wire diameter will be 0.030” or 0.035”; the question is, which one should you choose?
The thinner the material you’re welding, the smaller the wire diameter you must choose.
0.030” wire will weld 20 gauge to 14 gauge sheet metal, and 0.035” wire will weld 18 gauge to 3/16” thick steel.
The thickness of the metal is important, but 0.030” and 0.035” diameter wire overlap in what gauges of steel they’ll weld.
If you don’t have a powerful machine or can only use 120-volt power, 0.030” wire is the best choice. This is because it takes less current to melt thinner wires.
Thicker wire will also have more flux inside, resulting in better-shielding gas coverage. For situations where you need more gas coverage, such as welding outdoors, 0.035” wire can be the better option.
3. Use a Knurled V Roller
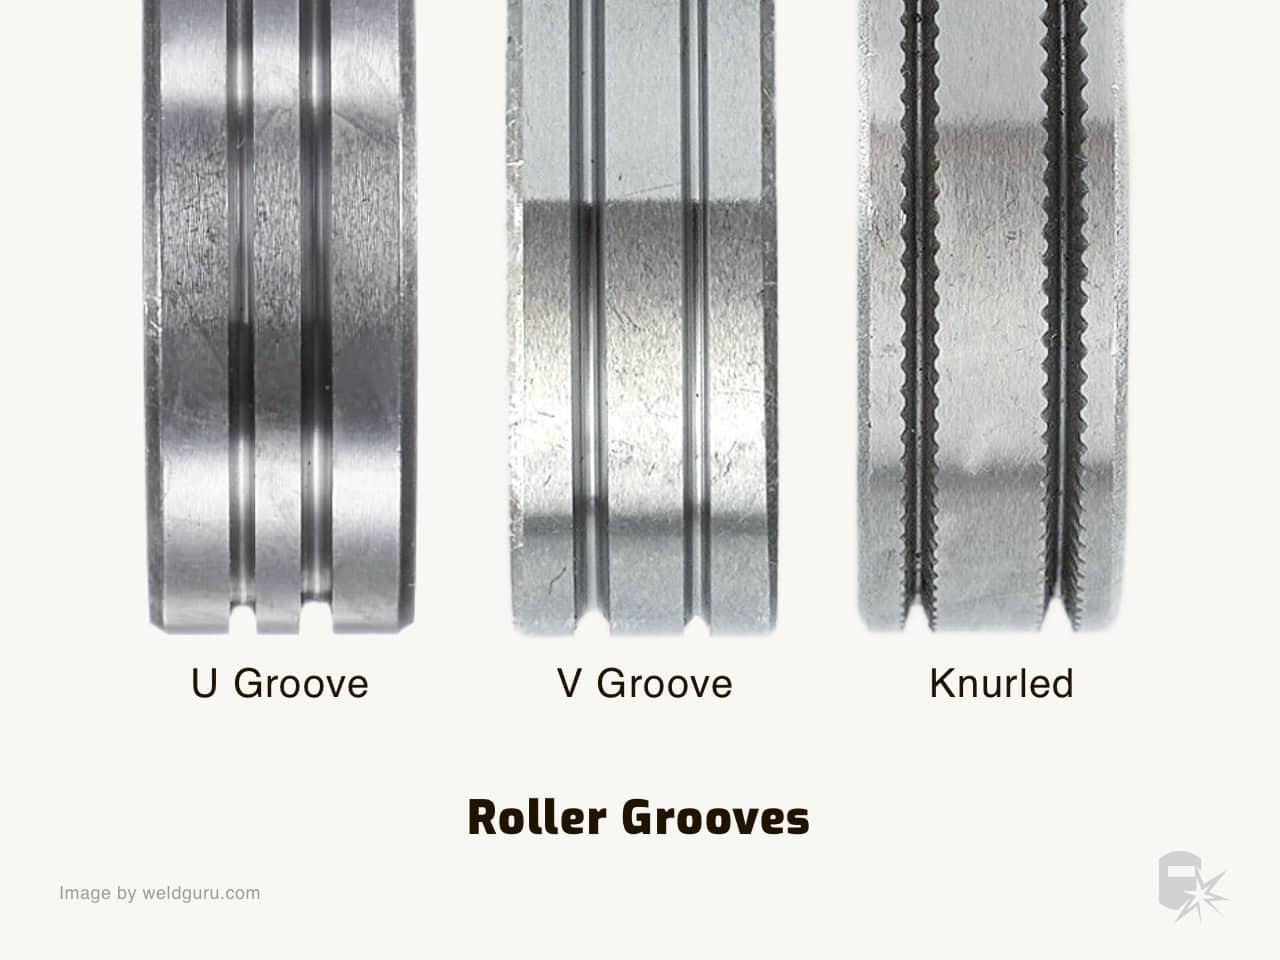
You can’t use the same rollers for MIG that you would with flux core welding.
Flux core wire needs a knurled roller, which helps to reduce the wire’s tension.
© weldguru.com – Image usage rights
If you use a smooth MIG welding roller, you’d have to use so much tension that you’d crush the tubular wire.
Rollers come in sizes specific to the wire size that you’re using.
Make sure you have rollers for each diameter wire, and remember to change them when switching between wire sizes.
4. Adjust the Wire Tension
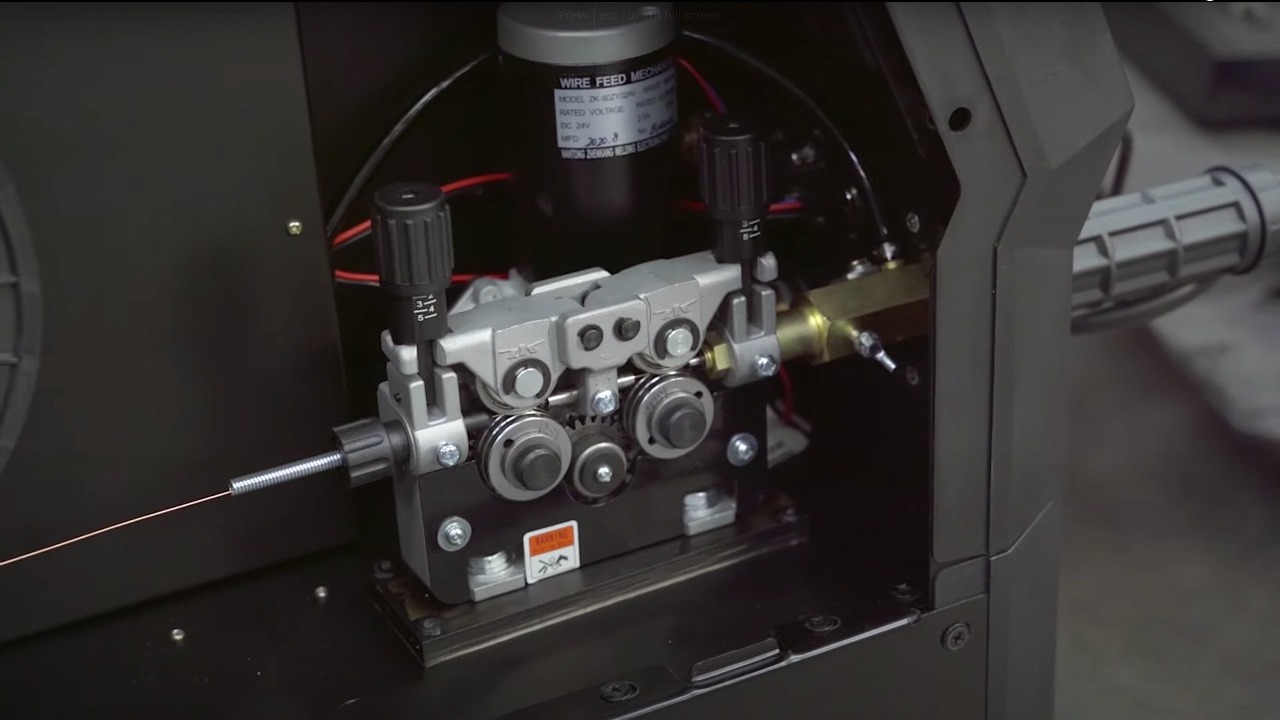
Correct wire tension is important but tricky to get right.
- Too little tension will result in the rolls slipping and not feeding the wire effectively, while too much tension will crush the wire.
- Too much tension flattens the wire and can cause birdnesting in the wire feeder.
© weldguru.com – Image usage rights
One method of setting the tension is to feed the wire from the welding gun into a non-conductive surface, such as a block of wood.
Adjust the tension until the rolls slip as the wire jams into the block. Then tighten the rolls ½ turn more.
5. Use the Correct Wire Stickout
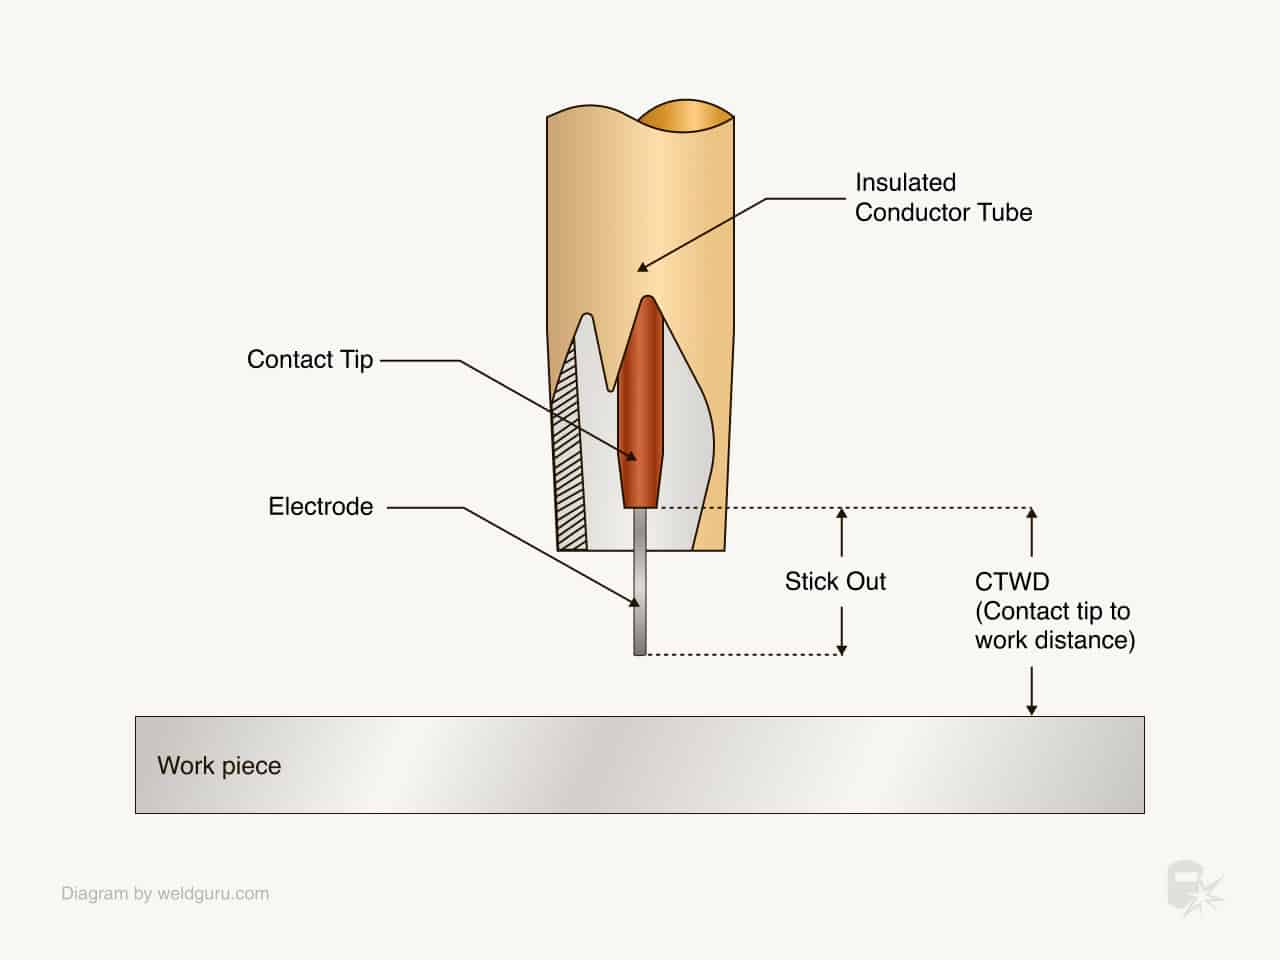
Wire stickout is the distance that the wire extends from the contact tip to where the arc melts it.
The correct wire stickout is important because the distance between the workpiece and the welding gun’s nozzle determines the gas shield’s effectiveness.
© weldguru.com – Image usage rights
This does not mean you should run an excessively short wire stickout, though.
When your wire stickout is too short, the wire can burn back into the contact tip, causing it to get clogged.
Too long of a stickout means the gas shield will be less effective, and the arc may become erratic and wander.
Generally, try to use a stickout of around ¾ of an inch.
6. Get a Good & Secure Ground Connection
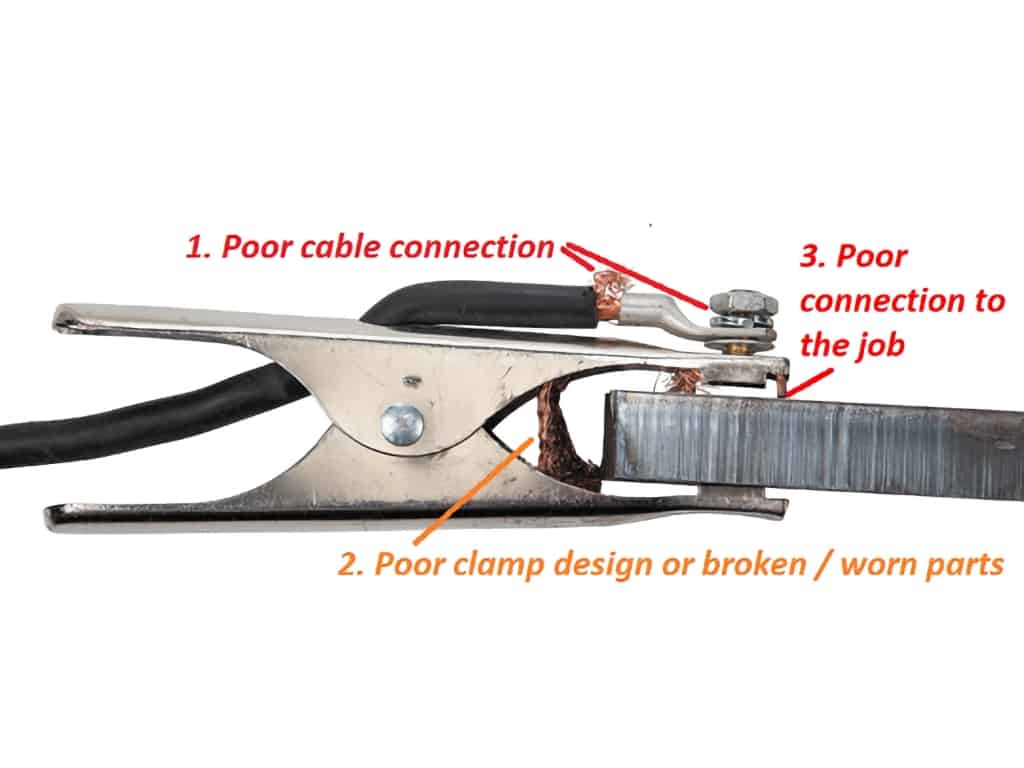
The ground connection completes the circuit, allowing the welding process to work.
A good and secure ground connection is critical, regardless of the type of welding that you do, and flux core welding is no exception.
Credit: https://www.weldclass.com.au
A bad connection may cause the wire to stub out on the workpiece, making you think your settings are to blame. You may just have a poor-quality clamp.
Always clamp your ground to clean bare metal.
7. Make Sure You Have the Right Polarity
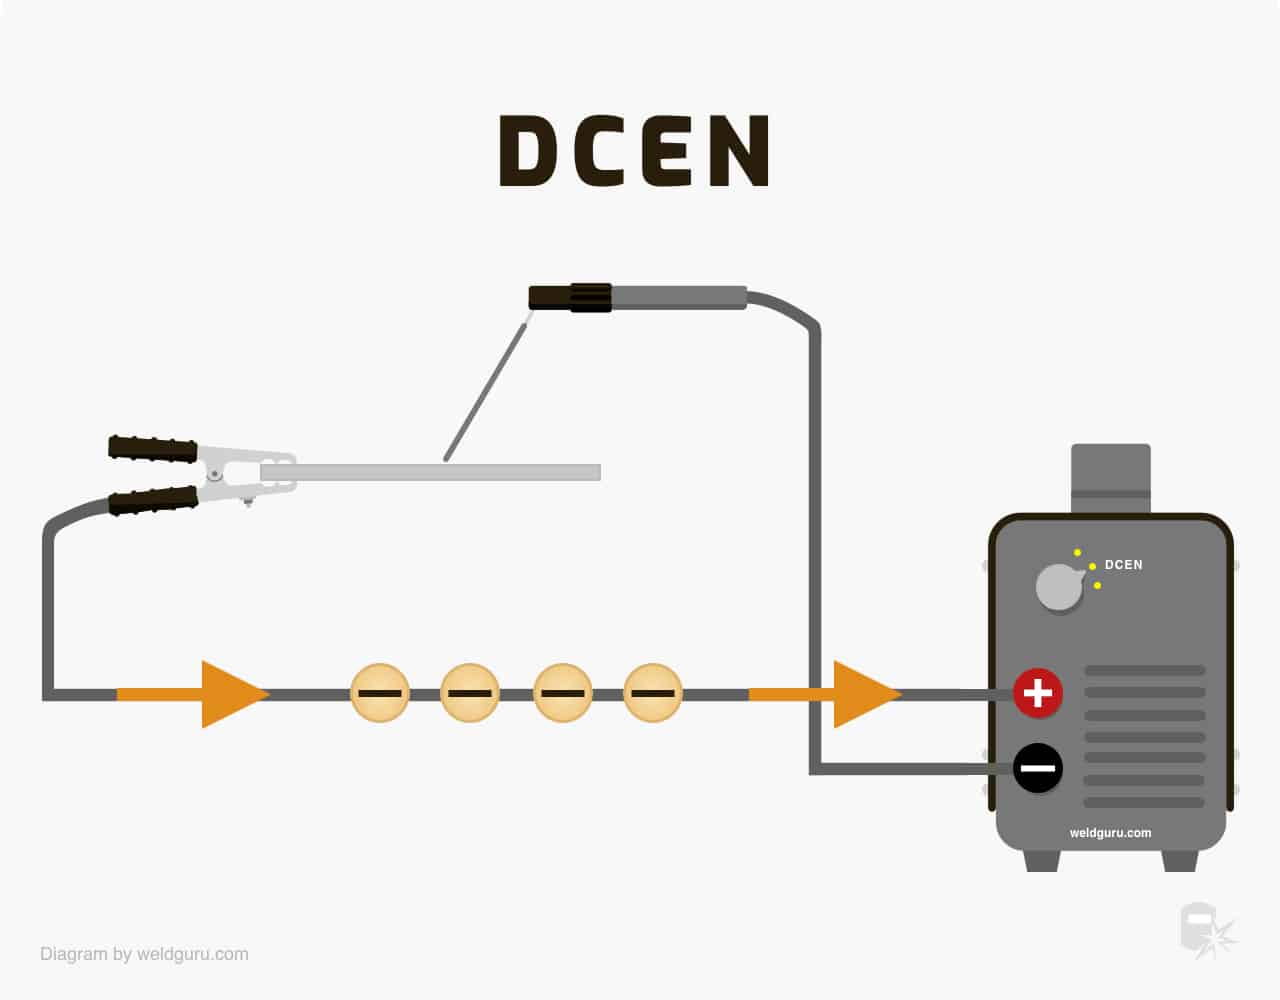
To weld with flux core, you must set the welding machine to direct current electrode negative (DCEN).
This is an important step because most wire feed welders are default set to direct current electrode positive (DCEP) for MIG welding.
© weldguru.com – Image usage rights
When switching your machine from MIG to flux core, always double-check the set polarity.
A few flux core wires will use DCEP, but they are specialty wires that you’re unlikely to encounter.
8. Drag Your Welds
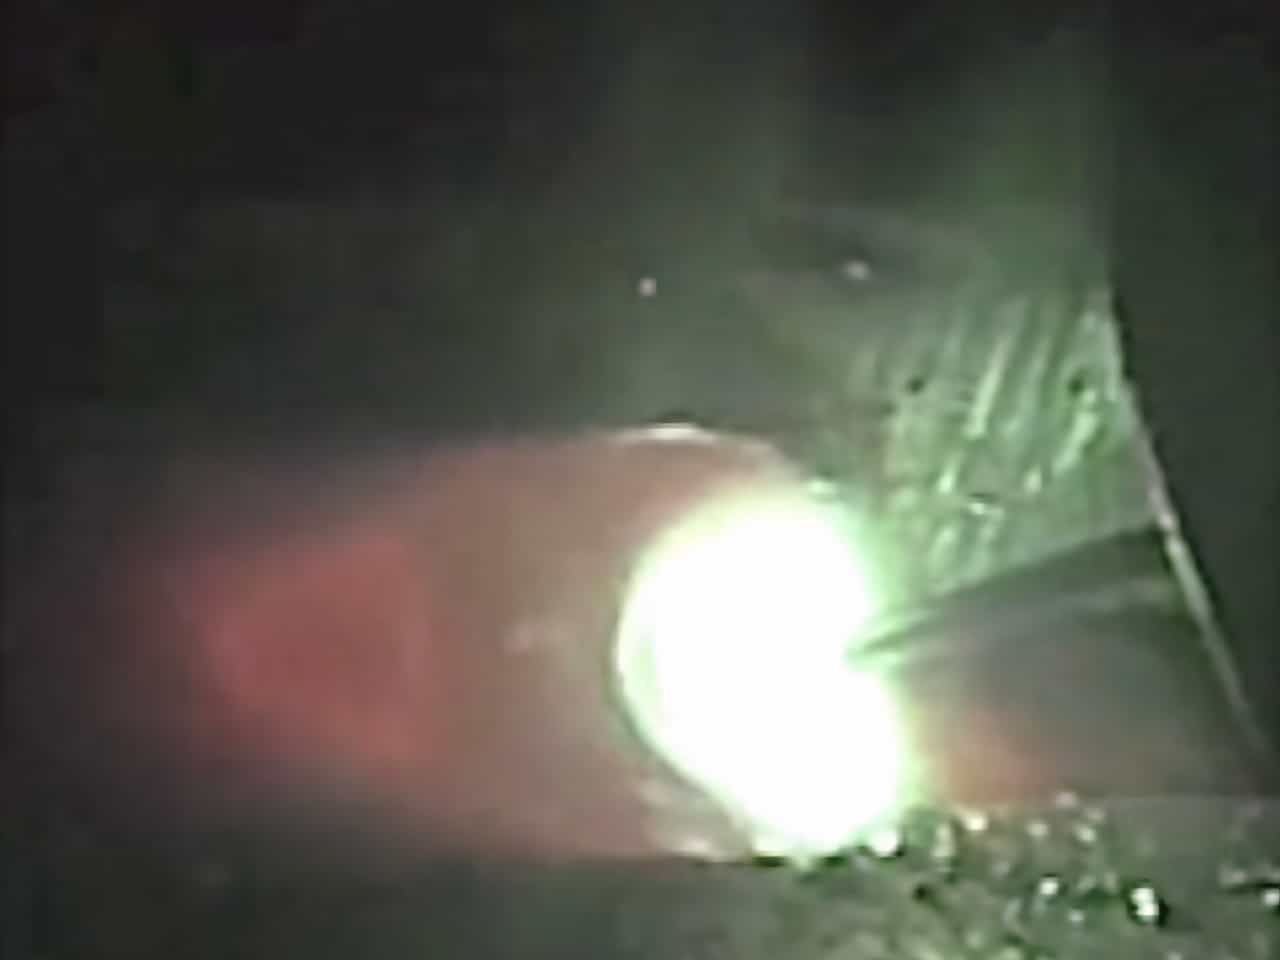
Flux core welding requires a dragging technique with the welding gun pointing towards the weld puddle.
Using a pushing technique runs a risk of the puddle getting ahead of the arc. When this happens, slag can get trapped in the weld, causing slag inclusions.
© weldguru.com – Image usage rights
When you use the dragging technique, the arc pushes the flux back through the puddle. This allows the flux to do its job and the slag to float to the top and freeze without trapping it in the weld.
Sometimes, the part you’re working on has corners or tight spots you cannot drag a weld in.
In these cases, you may have to push the weld. If you are in this predicament, keep the travel angle as close to perpendicular as possible.
© weldguru.com – Image usage rights
You’ll also want your wire at the leading edge of your weld puddle. This position will help to prevent slag inclusions in the weld.
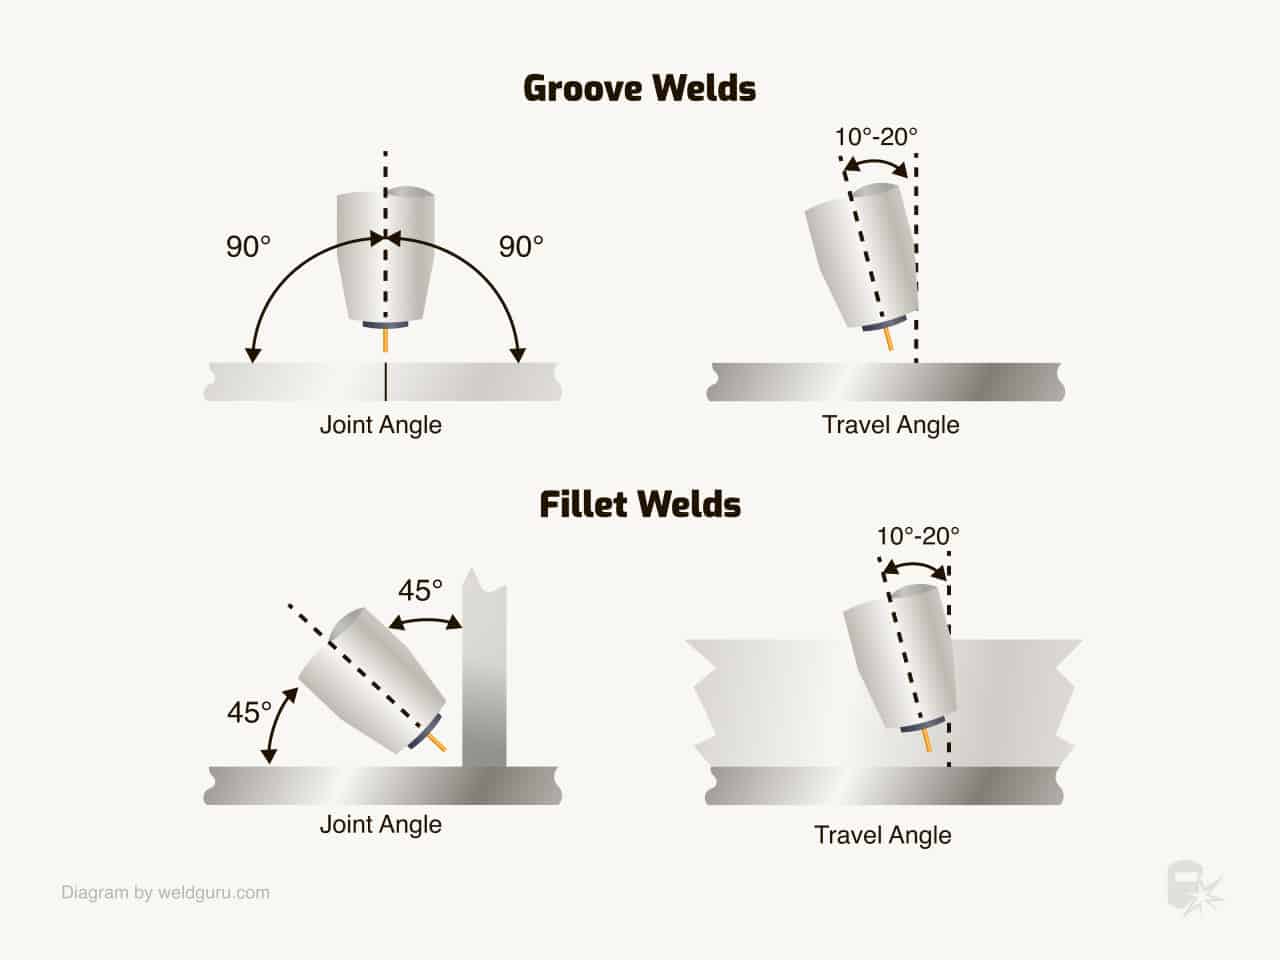
9. Use the Right Travel Angle
For most flux core welds, you’ll want a travel angle between 5 and 15 degrees.
© weldguru.com – Image usage rights
You can vary the travel angle a bit beyond this range, but when you get more than 20 or 25 degrees, you’ll find more spatter, less penetration, and an unstable arc and risk porosity for poor gas coverage.
10. Maintain a Good Travel Speed
Travel speed is essential in any wire feed welding process. Too slow will pour too much heat into the weld joint, causing distortion, burn-through, cold lap, and too large welds.
When your travel speed is too fast, your welds will be too small, lack fusion, and you risk getting undercut.
Finding the right travel speed can be tricky.
Most wire manufacturers will have a suggested travel speed, amperage, and voltage settings.
You’ll often need to run practice beads on some scrap material to see how the welds look with various travel speeds.
Once you find the right speed, you need to keep that speed consistent.
Every variation in your travel speed will show up in the toe of the weld. Watch the edges of your puddle, note the width of the puddle, and move the gun along the joint at a speed that keeps that same size throughout.
11. Maintain Appropriate Heat Input
Heat input is always critical in any welding process, which is true of flux core. I
f your heat is too low, you’ll have a lack of fusion, slag inclusions, and poor penetration. But too much heat will distort the material, cause excessive penetration, and result in large, unsightly welds.
The best place to start is the manufacturer’s recommended settings. From there, you can adjust based on what you see in the weld.
The best way to dial in your heat is to run test beads on scrap material until you get the results that you’re looking for.
12. Know When You Need To Manipulate the Arc
Especially when welding on thinner sheets and plates, you’ll be running single beads without much manipulation of the puddle.
There are many situations where you’ll want to manipulate the arc to get better results.
Vertical up welds need a weave pattern to stack the welds on top of each other, building up the weld joint.
Horizontal welds may need you to move the arc to push the weld metal up on the vertical plate. This is because gravity pulls weld metal to settle on the bottom plate.
Flat multi-pass welds may call for a weaved cap pass. If you weave a weld, don’t make it too wide; the wider the weld, the more likely the possibility of trapping slag in the weld metal.
It’s good to experiment with manipulating the arc to get a feel for how it’ll affect the final product. Set aside some practice time for working on arc manipulation; it will be well worth your time.
13. Clean Thoroughly Between Weld Passes
Flux core welding produces a layer of slag over the weld, which helps to shape the weld bead and protects it from the atmosphere.
After every flux core weld, you’ll need to chip the slag off and thoroughly clean the weld with either a wire brush or wire wheel attached to an angle grinder.
This is especially important during multi-pass welds. Chipping only the slag off isn’t good enough; slag dust and other contaminants will be trapped underneath the next pass.
14. Watch Out for Common Problems
You’ll face many issues as you learn the ins and outs of flux core welding.
You can easily resolve most of these issues with some adjustments to the machine settings or welding technique.
Worm Tracks
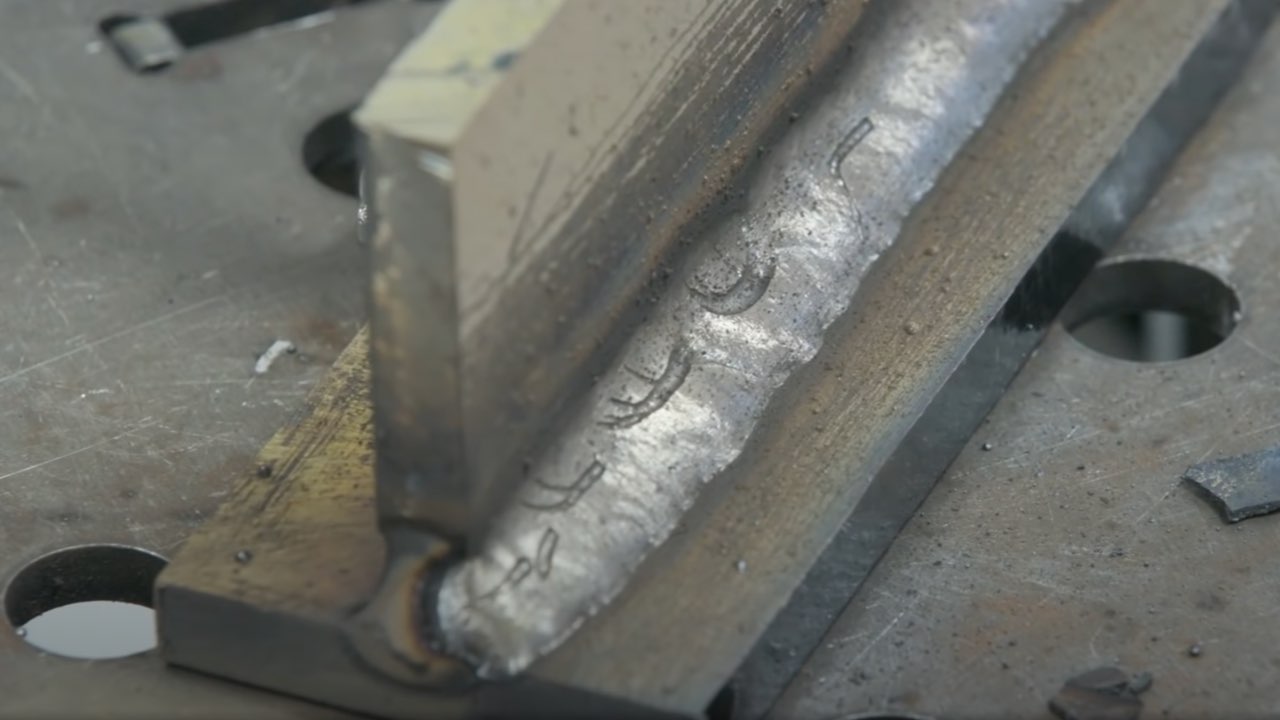
Worm tracks are grooves on the surface of a flux core weld. They form when gas produced during welding cannot fully escape the weld.
If your welds have worm-tracking issues, a voltage that’s too high is probably to blame.
Start by reducing the voltage, using the wire manufacturer’s suggestions as a guide.
Porosity
© weldguru.com – Image usage rights
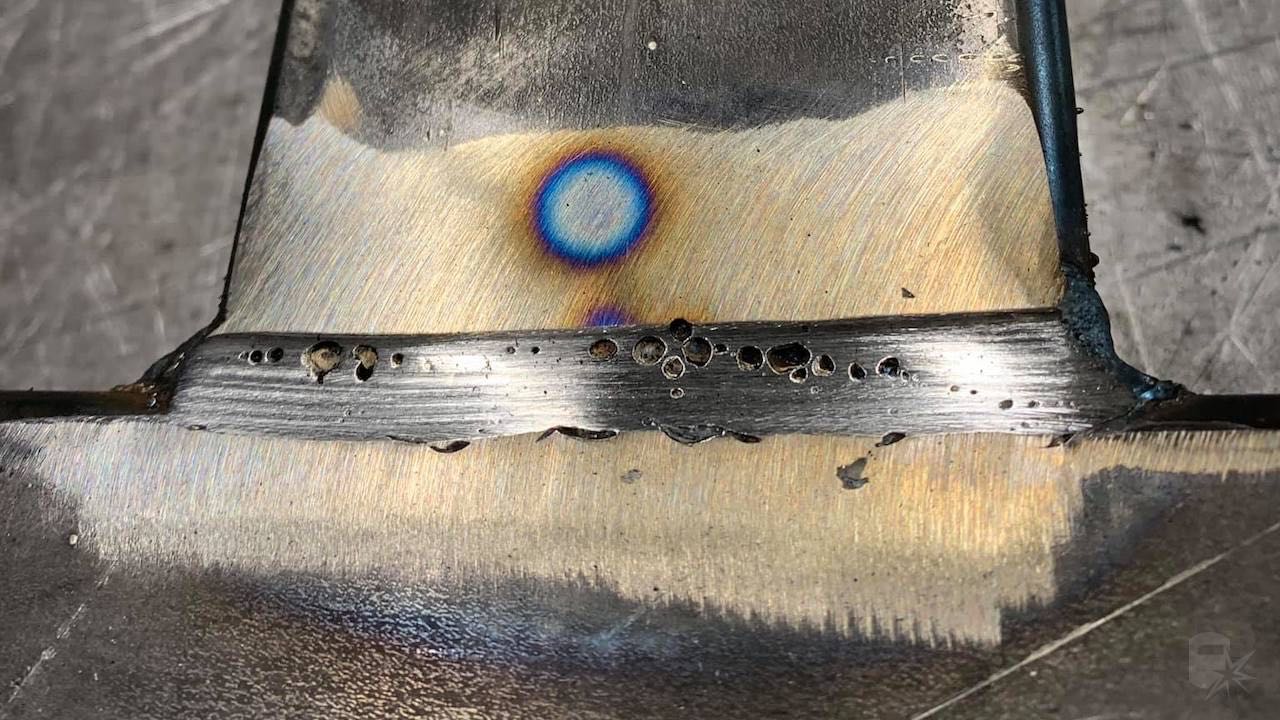
You’ll get porosity either by contamination in the weld area or bad gas coverage.
Always clean the metal before welding and between passes, but if you still get porosity, it’s probably due to gas coverage issues.
If you get porosity, start by cleaning the gun’s nozzle. A nozzle clogged with spatter will not allow enough gas to get through.
Wire stickout that’s too long, a gas flow rate that’s too high or low, or drafts and wind can also lead to porosity in your welds.
Birdnesting
© weldguru.com – Image usage rights
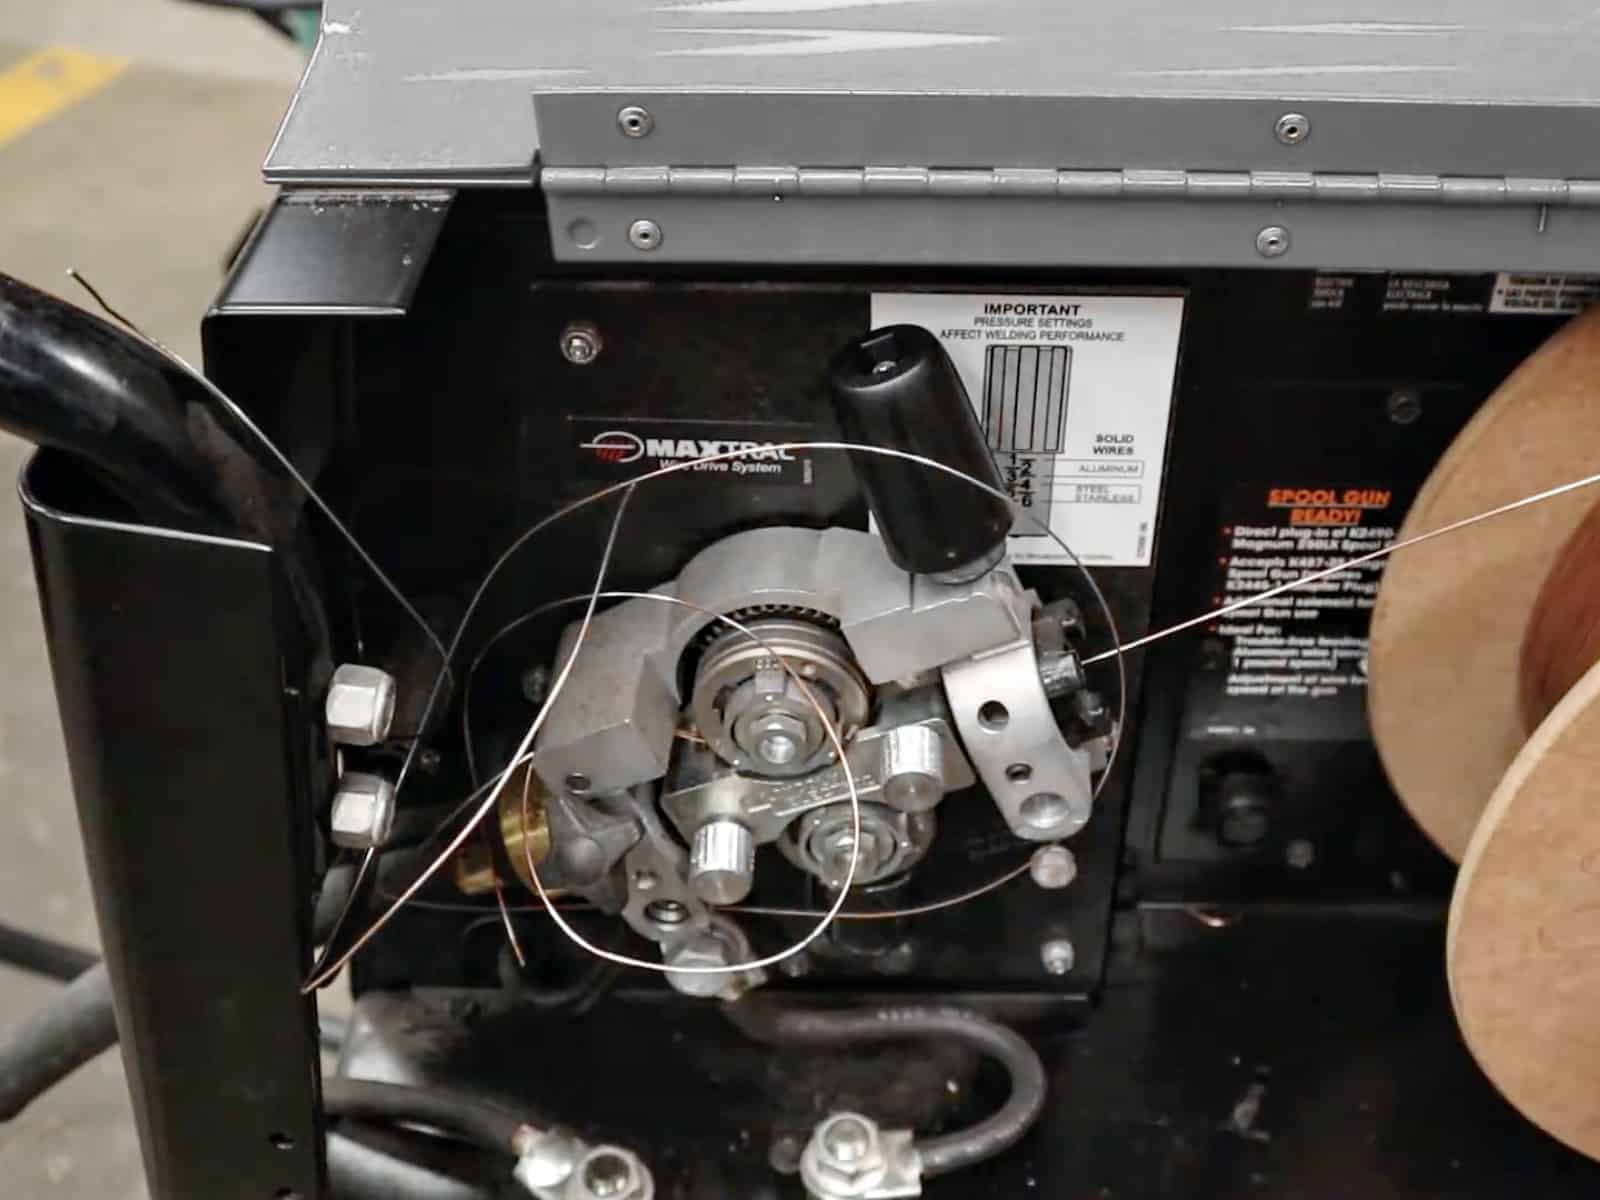
Birdnesting is when the wire binds in the wire feeder, but as the wire feed rolls continue to spin, the wire fills the wire feeder in a jumbled mess.
Drive roll tension set too high, incorrect drive rolls, and wrong size or clogged liner are all factors that can cause birdnesting.
Sometimes, the wire will melt to the end of the contact tip. The term for this is “burnback,” a common issue in flux core and MIG welding.
A wire stick out that’s too short, an inconsistent feed rate, a wire feed rate which is too slow, or a worn or faulty liner all cause burnback.
Wrapping It Up
Using any welding process effectively is challenging, and flux core is no exception.
These tips and tricks will have you well on your way to mastering the art of flux core welding, but you’ll still need to spend time practicing to get truly proficient.
