The mechanical properties of metals determine the range of usefulness of the metal and establish the service that can be expected.
Said another way it refers to how metals will respond to external loads.
This includes how they deform (twist, compress, elongate) or break as a function of applied temperature, time, load and other conditions.
Mechanical properties are also used to help specify and identify the metals.
They are important in welding because the weld must provide the same mechanical properties as the base metals being joined.
The adequacy of a weld depends on whether or not it provides properties equal to or exceeding those of the metals being joined.
Mechanical properties are characterized by stress and strain (tension, compression, shear, torsion), elastic deformation and plastic deformation (yield strength, tensile strength, ductility, toughness, hardness).
- Hardness: Resistance to abrasion and indentation.
- Toughness and Resilience: Measure of how metal absorbs energy
- Ductility: measure of the ability to deform plastically without fracture (fracture strain, area reduction, elongation)
- Strength: Offset yield, proof, fracture, yield, ultimate – measured as stress
- Stiffness: Young’s Modulus or Elastic Modulus
- Loading: Tensile (pulling on each end of a metal bar is tensile strength), compressive, shear, torsion)
- Stress and Strain: tension and compression, shear and torsion
The mechanical properties of metals are almost always given in MPa or Ksi. (1000 psi = 1 ksi = 6.89 MPa).
For detail on each mechanical properties of metals concept continue reading below.
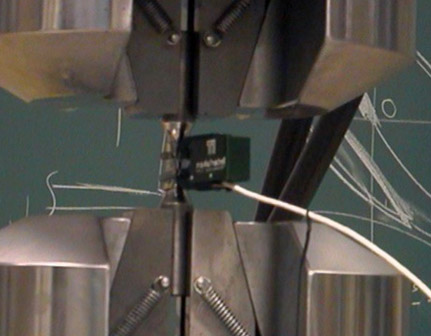
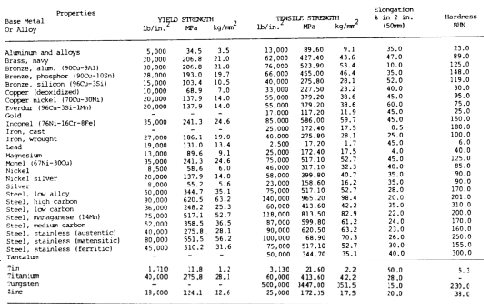
Table of Mechanical Properties of Metals
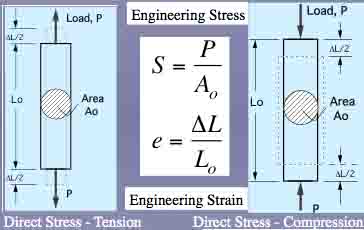
Stress and Strain
Metal stress and strain are one of the primary mechanical properties of metals. Another way to think about the concept is load/area. The deformation of metal can be measured directly, although stress cannot.
- Strain: deformation of the component/original length
- Stress: torsional, shear and direct
Metal Tensile Strength
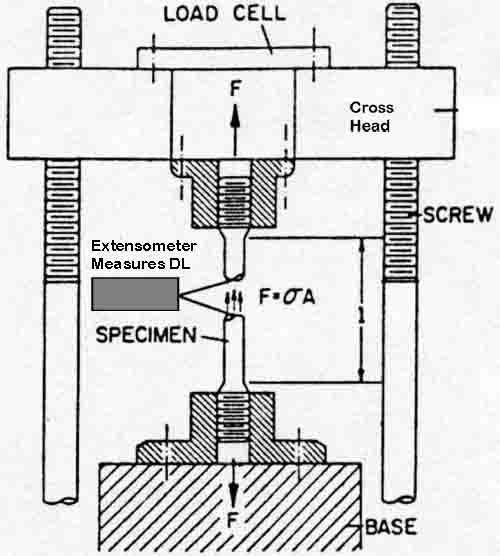
Tensile strength is defined as the maximum load in tension a material will withstand before fracturing, or the ability of a material to resist being pulled apart by opposing forces.
Also known as ultimate strength, it is the maximum strength developed in a metal in a tension test. (The tension test is a method for determining the behavior of a metal under an actual stretch loading.
This test provides the elastic limit, elongation, yield point, yield strength, tensile strength, and the reduction in area.) The tensile strength is the value most commonly given for the strength of a material and is given in pounds per square inch (psi) (kiloPascals (kPa)).
The tensile strength is the number of pounds of force required to pull apart a bar of material 1.0 in. (25.4 mm) wide and 1.00 in. (25.4 mm) thick (see figure 7-1 below).

Shear Strength
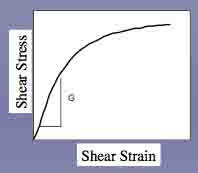
Shear strength is the ability of a material to resist being fractured by opposing forces acting of a straight line but not in the same plane, or the ability of a metal to resist being fractured by opposing forces not acting in a straight line (see figure 7-2 below).
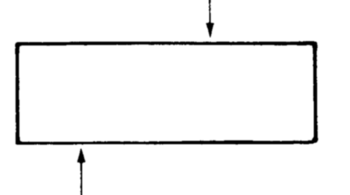
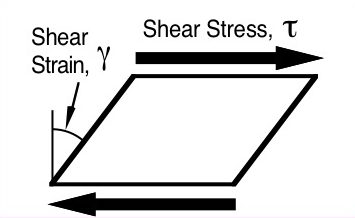
Diagram:
shear stress, t = Shear Load / Area
shear strain, g = angle of deformation (radians)
shear modulus, G = t /g (elastic region)
Fatigue Strength
Fatigue strength is the maximum load a material can withstand without failure during a large number of reversals of load. For example, a rotating shaft which supports a weight has tensile forces on the top portion of the shaft and compressive forces on the bottom. As the shaft is rotated, there is a repeated cyclic change in tensile and compressive strength. Fatigue strength values are used in the design of aircraft wings and other structures subject to rapidly fluctuating loads. Fatigue strength is influenced by micro-structure, surface condition, corrosive environment, and cold work.
Compressive Strength
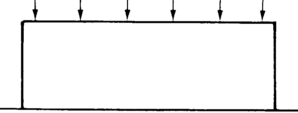
Compressive strength is the maximum load in compression a material will withstand before a predetermined amount of deformation, or the ability of a material to withstand pressures acting in a given plane (figure 7-3).
The compressive strength of both cast iron and concrete are greater than their tensile strength. For most materials, the reverse is true.
Elasticity
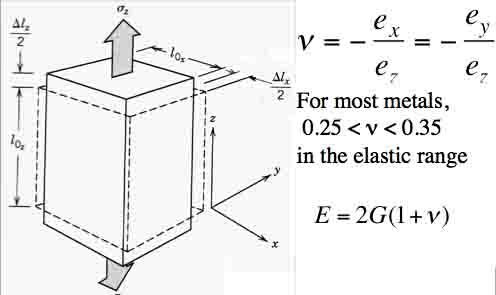
Elasticity is the ability of metal to return to its original size, shape, and dimensions after being deformed, stretched, or pulled out of shape.
- The elastic limit is the point at which permanent damage starts.
- The yield point is the point at which definite damage occurs with little or no increase in load.
- The yield strength is the number of pounds per square inch (kiloPascals) it takes to produce damage or deformation to the yield point.
Measured using Poisson’s ratio (the ratio of lateral to axial strain), which states that when a metal is strained in one direction, there are corresponding strains in all other directions.
Modulus of Elasticity
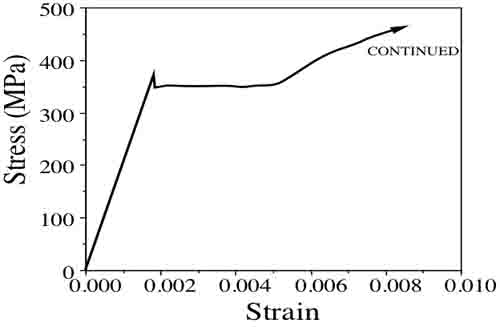
The modulus of elasticity is the ratio of the internal stress to the strain produced.
Elastic Deformation
Hooke’s Law:
S = Ee
The concept of elastic deformation refers to deformation that is not permanent.
The load on the metal creates the deformation which returns to its original form and dimensions when the load is removed.
When it comes to the majority of metals, the region which is elastic is linear.
Non-linear metals include cast iron.
Hooke’s law is applied to linear elastic behavior where E is the modulus of elasticity.
Ductility
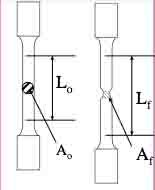
The ductility of a metal is that property which allows it to be stretched or otherwise changed in shape without breaking, and to retain the changed shape after the load has been removed.
It is the ability of a material, such as copper, to be drawn or stretched permanently without fracture.
The ductility of a metal can be determined by the tensile test by determining the percentage of elongation.
The lack of ductility is brittleness or the lack of showing any permanent damage before the metal cracks or breaks (such as with cast iron).
Elongation Equation
The strain at fracture in tension, expressed as a percentage:
( ( final gage length – initial gage length ) / initial gage length ) x 100
Percent elongation is a measure of ductility.
Area Reduction
The reduction in cross-sectional area of a tensile specimen at fracture:
( ( initial area – final area ) / initial area ) x 100
Percent reduction in area is also a measure of ductility.
Brittleness
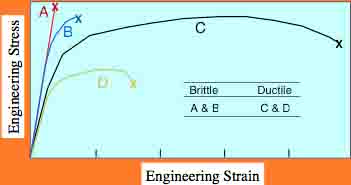
Brittleness is the property opposite of plasticity or ductility.
A brittle metal is one than cannot be visibly deformed permanently, or one that lacks plasticity.
- Metals are brittle is the EL% < 5% (approximate)
- Metals are ductile if the EL% > 8% (approximate)
Plasticity
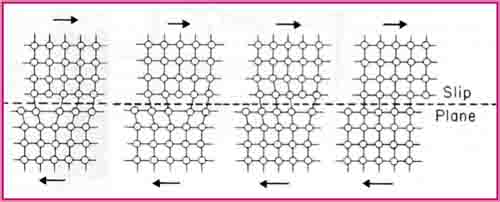
Plasticity is the ability of a metal to be deformed extensively without rupture. Plasticity is similar to ductility.
It measure the slide, climb and slip of atoms in the crystal structure.
The climb and slip occur at dislocations while slide occurs at the grain boundaries.
Malleability
Malleability is another form of plasticity, and is the ability of a material to deform permanently under compression without rupture. It is this property which allows the hammering and rolling of metals into thin sheets. Gold, silver, tin, and lead are examples of metals exhibiting high malleability. Gold has exceptional malleability and can be rolled into sheets thin enough to transmit light.
Reduction of Area
This is a measure of ductility and is obtained from the tensile test by measuring the original cross-sectional area of a specimen to a cross-sectional area after failure.
Resilience and Toughness
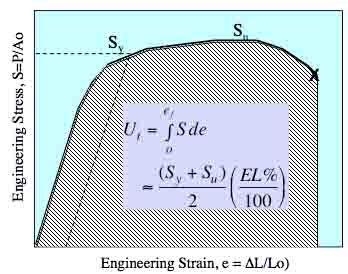
Toughness is a combination of high strength and medium ductility.
It is the ability of a material or metal to resist fracture, plus the ability to resist failure after the damage has begun.
A tough metal, such as cold chisel, is one that can withstand considerable stress, slowly or suddenly applied, and which will deform before failure.
Toughness is the ability of a material to resist the start of permanent distortion plus the ability to resist shock or absorb energy.
Note that both the toughness and resilience equations are determined as:
energy/unit volume
Toughness Equation:
( J/m3 or N.mm/mm3= MPa )
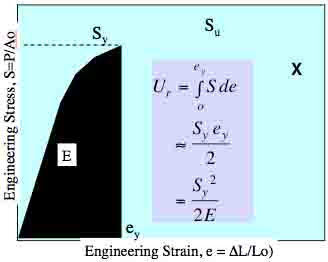
Resilience is the measure of the ability of a material to absorb energy without plastic or permanent deformation.
Resilience Equation:
( J/m3 or N.mm/mm3= MPa )
Weldability and Machinability
The property of weldabiity and machinability is the difficulty or ease with which a material can be welded or machined.
Abrasion Resistance
Abrasion resistance is the resistance to wearing by friction.
Impact Resistance
Resistance of a metal to impacts is evaluated in terms of impact strength.
A metal may possess satisfactory ductility under static loads, but may fail under dynamic loads or impact.
The impact strength of a metal is determined by measuring the energy absorbed in the fracture.
Hardness
Hardness is the ability of a metal to resist penetration and wear by another metal or material.
It takes a combination of hardness and toughness to withstand heavy pounding.
The hardness of a metal limits the ease with which it can be machined, since toughness decreases as hardness increases.
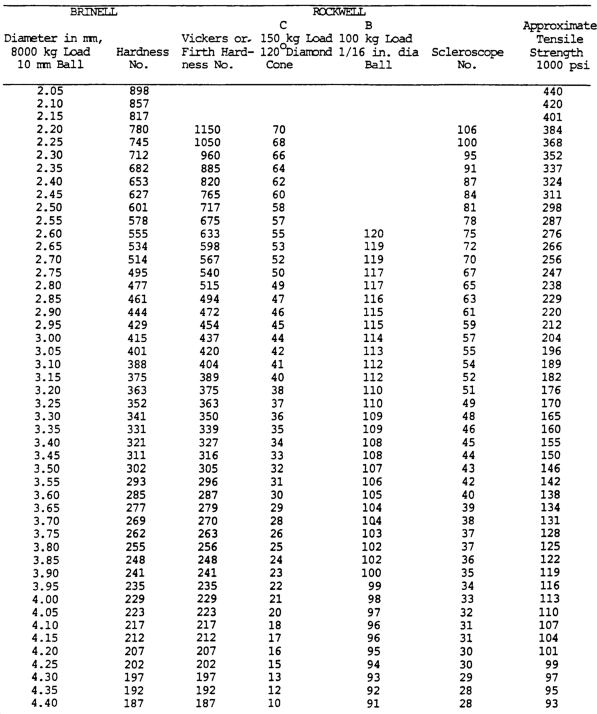
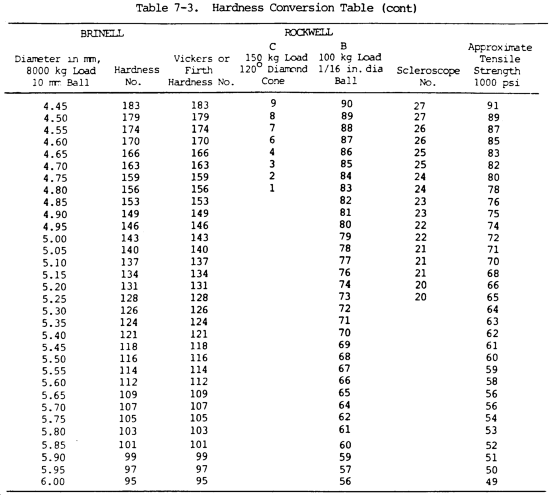
Table 7-3 below illustrates the hardness of various metals.
Elastic Deformation
The concept of elastic deformation is determined by Hooke’s Law. The notion is that elastic deformation is not permanent.
If a load is removed, the part returns to its original dimensions and shape.
Metal Harness Tests
Brinell Harness Test
In this test, a hardened steel ball is pressed slowly by a known force against the surface of the metal to be tested.
The diameter of the dent in the surface is then measured, and the Brinell hardness number (bhn) is determined by from standard tables (see table 7-3)
Rockwell Harness Test
This test is based upon the difference between the depth to which a test point is driven into a metal by a light load and the depth to which it is driven in by a heavy load.
The light load is first applied and then, without moving the piece, the heavy load is applied.
The hardness number is automatically indicated on a dial.
The letter designations on the Rockwell scale, such as B and C, indicate the type of penetrator used and the amount of heavy load (table 7-3).
The same light load is always used.
Scleroscope Hardness Test
This test measures hardness by letting a diamond-tipped hammer fall by its own weight from a fixed height and rebound from the surface; the rebound is measured on a scale.
It is used on smooth surfaces where dents are not desired.
For Additional Reading
Mech. Properties of Metals – Bohr, University of Virginia