The tests described below have been developed to check the skill of the welding operator as well as the quality of the weld metal and the strength of the welded joint for each type of metal used in ordnance material.
Many tests detect defects not visible to the naked eye.
Destructive Tests
Some of these tests, such as tensile and bending tests, are destructive, in that the test Specimens are loaded until they fail, so the desired information can be gained.
Destructive Tests are in two categories:
- Workshop based tests
- Laboratory tests (corrosive, chemical, microscopic, macroscopic/magnifying glass)
Non-destructive Tests (NDT)
Other testing methods, such as the X-ray and hydrostatic tests, are not destructive (NDT).
This type of testing is also referred to as NDE or nondestructive examination and NDI or nondestructive inspection.
The goal of these methods is to exam the welds without causing any damage.
Each weld physical testing approach is described below.
Destructive Physical Weld Testing
Acid Etch Test
This type or physical weld testing is used to determine the soundness of a weld. The acid attacks or reacts with the edges of cracks in the base or weld metal and discloses weld defects, if present. It also accentuates the boundary between the base and weld metal and, in this manner, shows the size of the weld which may otherwise be indistinct. This test is usually performed on a cross-section of the joint.
Solutions of hydrochloric acid, nitric acid, ammonium persulfate, or iodine and potassium iodide are commonly used for etching carbon and low alloy steels.
Guided Bend Test
The quality of the weld metal at the face and root of the welded joint, as well as the degree of penetration and fusion to the base metal, are determined by means of guided bend tests. It also shows the efficiency of the weld.
This type of physical weld testing is made in a jig (fig 13-1). These test specimens are machined from welded plates, the thickness of which must be within the capacity of the bending jig. The test specimen is placed across the supports of the die which is the lower portion of the jig. The plunger, operated from above by a hydraulic jack or other devices, causes the specimen to be forced into and to assure the shape of the die.
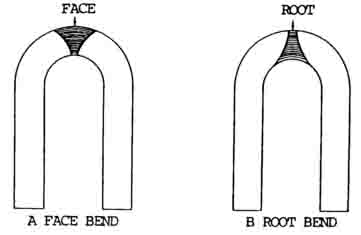
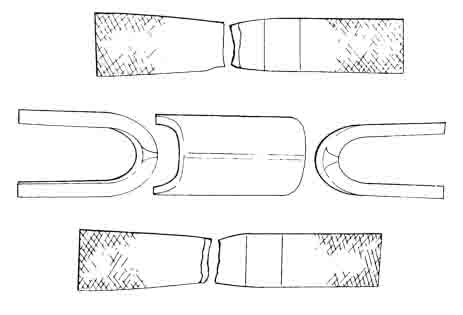
To fulfill the requirements of this test, the specimens must bend 180 degrees and, to be accepted as passable, no cracks greater than 1/8 in. (3.2 mm) in any dimension should appear on the surface. The face bend tests are made in the jig with the face of the weld in tension (i.e., on the outside of the bend) (A – fig 13-2). The root bend tests are made with the root of the weld in tension (i. e., on outside of the bend) (B – fig 13-2). Guided bend test specimens are also shown the in figure 13-3.
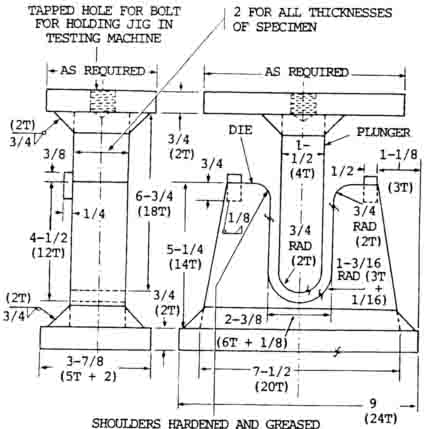
Notes:
- T=Test Plate Thickness
- Hardened Rolls May be used on shoulders if desired
- Specific dimensions for 3/7 plate
- All dimensions shown are in inches
Free Bend Test
The free bend physical weld testing approach has been devised to measure the ductility of the weld metal deposited in a weld joint. A physical weld testing specimen is machined from the welded plate with the weld located as shown at A, figure 13-4.
Each corner lengthwise of the specimen shall be rounded in a radius not exceeding one-tenth of the thickness of the specimen. Tool marks, if any, shall be lengthwise of the specimen. Two scribed lines are placed on the face 1/16 in. (1.6 mm) in from the edge of the weld. The distance between these lines is measured in inches and recorded as the initial distance X (B, figure 13-4). The ends of the test specimen are then bent through angles of about 30 degrees, these bends being approximately one-third of the length in from each end. The weld is thus located centrally to ensure that all of the bending occurs in the weld.
The specimen bent initially is then placed in a machine capable of exerting a large compressive force (C, figure 13-4) and bent until a crack greater than 1/16 in. (1.6 mm) in any dimension appears on the face of the weld. If no cracks appear, bending is continued until the specimens 1/4 in. (6.4 mm) thick or under can be tested in a vise. The heavier plate is usually tested in a press or bending jig.
Whether a vise or other type of compression device is used when making the free bend test, it is advisable to machine the upper and lower contact plates of the bending equipment to present surfaces parallel to the ends of the specimen (E, figure 13-4). This will prevent the specimen from slipping and snapping out of the testing machine as it is bent.
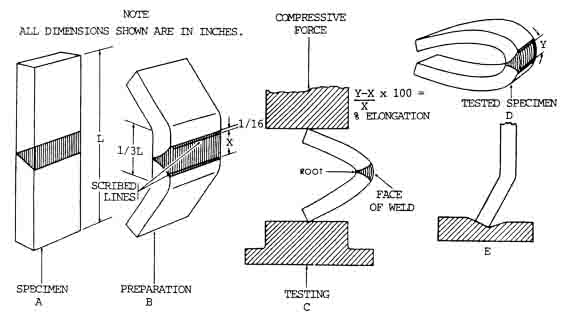
After bending the specimen to the point where the test bend is concluded, the distance between the scribed lines on the specimen is again measured and recorded as the distance Y. To find the percentage of elongation, subtract the initial from the final distance, divide by the initial distance, and multiply by 100 (figure 13-4). The usual requirements for passing this test are that the minimum elongation be 15 percent and that no cracks greater than 1/16 in. (1.6 mm) in any dimension exist on the face of the weld.
The free bend test is being largely replaced by the guided bend test where the required testing equipment is available.
Related read: Welding Cracks – What are they & How to prevent them
Back Bend Test
The back bend test is a type of physical weld testing that is used to determine the quality of the weld metal and the degree of penetration into the root of the Y of the welded butt joint. The specimens used are similar to those required for the free bend test except they are bent with the root of the weld on the tension side, or outside. The specimens tested are required to bend 90 degrees without breaking apart. This test is being largely replaced by the guided bend test.
Nick Break Test
The nick break test has been devised to determine if the weld metal of a welded butt joint has any internal defects, such as slag inclusions, gas pockets, poor fusion, and/or oxidized or burnt metal. The specimen is obtained from a welded butt joint either by machining or by cutting with an oxyacetylene torch. Each edge of the weld at the joint is slotted by means of a saw cut through the center (figure 13-5). The piece thus prepared is bridged across two steel blocks (figure 13-5) and stuck with a heavy hammer until the section of the weld between the slots fractures.
The metal thus exposed should be completely fused and free from slag inclusions. The size of any gas pocket must not be greater than 1/16 in. (1.6 mm) across the greater dimension and the number of gas pockets or pores per square inch (64.5 sq mm) should not exceed 6.
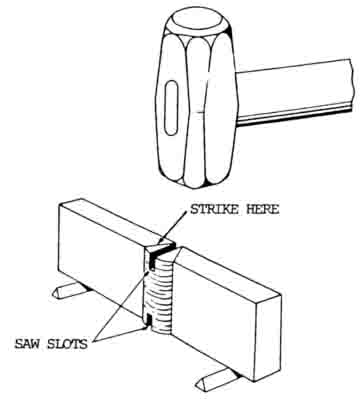
Another break test method is used to determine the soundness of fillet welds. This is the fillet weld break test. A force, by means of a press, a testing machine, or blows of a hammer, is applied to the apex of the V shaped specimen until the fillet weld ruptures. The surfaces of the fracture will then be examined for soundness.
Tensile Strength Test
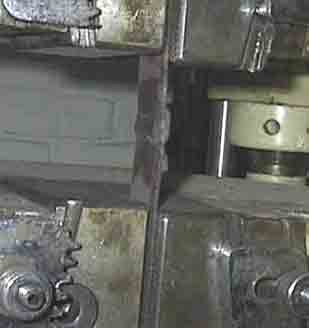
This type of physical weld testing is used to measure the strength of a welded joint. A portion of a to locate the welded plate is locate the weld midway between the jaws of the testing machine (figure 1306). The width thickness of the test specimen are measured before testing, and the area in square inches is calculated by multiplying these before testing , and the area in square inches is calculated by multiplying these two figures (see formula, figure 13-6).
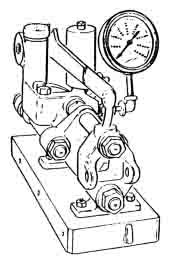
The tensile physical weld testing specimen is then mounted in a machine that will exert enough pull on the piece to break the specimen. The testing machining may be either a stationary or a portable type. A machine of the portable type, operating on the hydraulic principle and capable of pulling as well as bending test specimens, is shown in figure 13-7.
As the specimen is being tested in this machine, the load in pounds is registered on the gauge. In the stationary types, the load applied may be registered on a balancing beam. In either case, the load at the point of breaking is recorded. Test specimens broken by the tensile strength test are shown in figure 13-3.
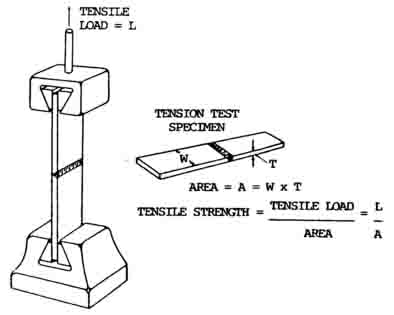
The tensile strength, which is defined as stress in pounds per square inch, is calculated by dividing the breaking load of the test piece by the original cross section area of the specimen. The usual requirements for the tensile strength of welds is that the specimen shall pull not less than 90 percent of the base metal tensile strength.
The shearing strength of transverse and longitudinal fillet welds is determined by tensile stress on the test specimens. The width of the specimen is measured in inches. The specimen is ruptured under tensile load, and the maximum load in pounds is determined. The shearing strength of the weld in pounds per linear inch is determined by dividing the maximum load by the length of fillet weld that ruptured. The shearing strength in pounds per square inch is obtained by dividing the shearing strength in pounds per linear inch by the average throat dimension of the weld in inches. The test specimens are made wider than required and machined down to size.
Related read: Common types of welding defects
Non-destructive Tests
Hydrostatic Test
This is a nondestructive type of physical weld testing used to check the quality of welds on closed containers such as pressure vessels and tanks. The test usually consists of filling the vessel with water and applying a pressure greater than the working pressure of the vessel. Sometimes, large tanks are filled with water which is not under pressure to detect possible leakage through defective welds. Another method is to test with oil and then steam out the vessel. Back seepage of oil from behind the liner shows up visibly.
Magnetic Particle Test
This is a physical weld testing or inspection method used on welds and parts made of magnetic alloy steels. It is applicable only to ferromagnetic materials in which the deposited weld is also ferromagnetic. A strong magnetic field is set up in the piece being inspected by means of high amperage electric currents.
A leakage field will be set up by any discontinuity that intercepts this field in the part. Local poles are produced by the leakage field. These poles attract and hold magnetic particles that are placed on the surface for this purpose. The particle pattern produced on the surface indicates the presence of a discontinuity or defect on or close to the surface of the part.
X-Ray Testing
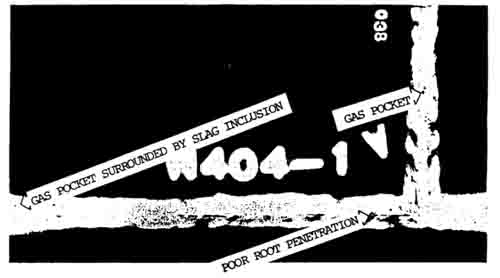
This is a radiographic physical weld testing method used to reveal the presence and nature of internal defects in a weld, such as cracks, slag, blowholes, and zones where proper fusion is lacking. In practice, an X-ray tube is placed on one side of the welded plate and an X-ray film, with a special sensitive emulsion, on the other side. When developed, the defects in the metal show up as dark spots and bands, which can be interpreted by an operator experienced in this inspection method.
Porosity and defective root penetration as disclosed by X-ray inspection are shown in figure 13-8.
Instructions for handling X-ray apparatus to avoid ahrm to operating personnel are found in the: American Standard Code for the Industrial Use of X-rays
Gamma Ray Test
This test is a radiographic physical weld testing and inspection method similar to the X-ray method described in the paragraph on acid etch testing, except that the gamma rays emanate from a capsule of radium sulfate instead of an X-ray tube.
Because of the short wavelengths of gamma rays, the penetration of sections of considerable thickness is possible, but the time required for exposure for any thickness of metal is much longer than that required for X-rays because of the slower rate at which the gamma rays are produced.
X-ray testing is used for most radiographic inspections, but gamma-ray equipment has the advantage of being extremely portable.
Fluorescent Penetrant Test (Dye Test)
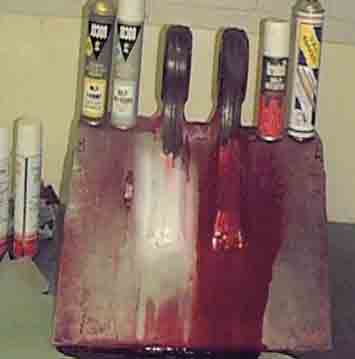
Fluorescent penetrant inspection is a nondestructive physical weld testing method by means of which cracks, pores, leaks, and other discontinuities can be located in solid materials. It is particularly useful for locating surface defects in non-magnetic materials such as aluminum, magnesium, and austenitic steel welds and for locating leaks in all types of welds. This method makes use of water washable, highly fluorescent material that has exceptional penetration qualities.
This material is applied to the clean dry surface of the metal to be inspected by brushing, spraying, or dipping. The excess material is removed by rinsing, wiping with clean water-soaked cloths, or by sandblasting. A wet or dry type developer is then applied. Discontinuities in surfaces that have been properly cleaned, treated with the penetrant, rinsed, and treated with the developer show brilliant fluorescent indications under black light.
Advantages of this physical weld testing method:
- Good for ferrous and nonferrous metals
- Low cost
- Easy to apply and interpret
- Minimal training
Disadvantages:
- Might miss problems below the surface
- Can’t work on porous materials
Types of Dye:
- Type A: Fluorescent that emits visible light when viewed using a black light
- Type B: Brightly colored dye that can be inspected in regular light. Simple to use and good for testing in the field.
Hardness Tests
Hardness may be defined as the ability of a substance to resist indentation of localized displacement. Simply said, resistance to indentation, wear and abrasion. The hardness test usually applied is a nondestructive test, used primarily in the laboratory and not to any great extent in the field. Hardness tests are used as a means of controlling the properties of materials used for specific purposes after the desired hardness has been established for the particular application.
A hardness test is used to determine the hardness of weld metal. By careful testing of a welded joint, the hard areas can be isolated and the extent of the effect of the welding heat on the properties of the base metal determined.
Hardness Testing Equipment
File Test:
The simplest method for determining comparative hardness is the file test. It is performed by running a file under manual pressure over the piece being tested. Information may be obtained as to whether the metal tested is harder or softer than the file or other materials that have been given the same treatment.
Hardness Testing Machines:
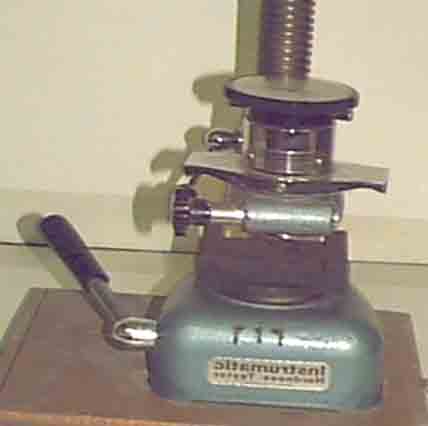
There are several types of hardness testing machines. Each of them is singular in that its functional design best lends itself to the particular field or application for which the machine is intended. However, more than one type of machine can be used on a given metal, and the hardness values obtained can be satisfactorily correlated. Two types of machines are used most commonly in laboratory tests for metal hardness: the Brinell hardness tester and the Rockwell hardness tester.
- Brinell Hardness TesterIn the Brinell tests, the specimen is mounted on the anvil of the machine and a load of 6620 lb (3003 kg) is applied against a hardened steel ball which is in contact with the surface of the specimen being tested. The steel ball is 0.4 in. (10.2 mm) in diameter. The load is allowed to remain 1/2 minute and is then released, and the depth of the depression made by the ball on the specimen is measured.It should be noted that, in order to facilitate the determination of Brinell hardness, the diameter of the depression rather than the depth is actually measured. Charts of Brinell hardness numbers have been prepared for a range of impression diameters. These charts are commonly used to determine Brinell numbers.The resultant Brinell hardness number is obtained by the following formula:

HB = Brinell hardness number
D = ball diameter (mm),
d = diameter of the resultant, recovered circular indentation (mm)
P = applied load (kg) - Rockwell Hardness TesterThe principle of the Rockwell tester is essentially the same as the Brinell tester. It differs from the Brinell tester in that a lesser load is impressed on a smaller ball or cone shaped diamond. The depth of the indentation is measured and indicated on a dial attached to the machine. The hardness is expressed in arbitrary figures called “Rockwell numbers.” These are prefixed with a letter notation such as “B” or “C” to indicate the size of the ball used, the impressed load, and the scale used in the test.
Other tests are Vickers diamond pyramid and Scleroscope.
Magnaflux Test
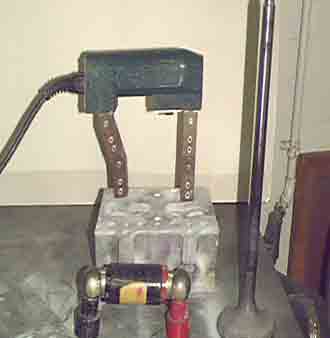
This is a rapid, non-destructive physical weld testing method for locating defects at or near the surface of steel and its magnetic alloys by means of correct magnetization and the application of ferromagnetic particles.
Basic Principles
For all practical purposes, magnaflux inspection may be likened to the use of a magnifying glass as a physical weld testing method. Instead of using a glass, however, a magnetic field and ferromagnetic powders are employed. The method of magnetic particle inspection is based upon two principles: one, that a magnetic field is produced in a piece of metal when an electric current is flowed through or around it; two, that minute poles are set up on the surface of the metal wherever this magnetic field is broken or distorted.
When ferromagnetic particles are brought into the vicinity of a magnetized part, they are strongly attracted by these poles and are held more firmly to them than to the rest of the surface of the part, thereby forming a visible indication.
Eddy Current (Electromagnetic Testing)
Eddy current (electromagnetic) testing is a nondestructive test method based on the principle that an electric current will flow in any conductor subjected to a changing magnetic field. It is used to check welds in magnetic and nonmagnetic materials and is particularly useful in testing bars, fillets, welded pipe, and tubes. The frequency may vary from 50 Hz to 1 MHz, depending on the type and thickness of material current methods. The former pertains to tests where the magnetic permeability of a material is the factor affecting the test results and the latter to tests where electrical conductivity is the factor involved.
Nondestructive physical weld testing by eddy current methods involve inducing electric currents (eddy or Foucault currents) in a test piece and measuring the changes produced in those currents by discontinuities or other physical differences in the test piece. Such tests can be used not only to detect discontinuities but also to measure variations in test piece dimensions and resistivity. Since resistivity is dependent upon such properties as chemical composition (purity and alloying), crystal orientation, heat treatment, and hardness, these properties can also be determined indirectly. Electromagnetic methods are classified as magneto-inductive and eddy current methods. The former pertains to tests where the magnetic permeability of a material is the factor affecting the test results and the latter to tests where electrical conductivity is the factor involved.
One method of producing eddy currents in a test specimen is to make the specimen the core of an alternating current (ac) induction coil. There are two ways of measuring changes that occur in the magnitude and distribution of these currents. The first is to measure the resistive component of impedance of the exciting coil (or of a secondary test coil), and the second is to measure the inductive component of impedance of the exciting (or of a secondary) coil. Electronic equipment has been developed for measuring either the resistive or inductive impedance components singly or both simultaneously.
Eddy currents are induced into the conducting test specimen by alternating electromagnetic induction or transformer action. Eddy currents are electrical in nature and have all the properties associated with electric currents. In generating eddy currents, the test piece, which must be a conductor, is brought into the field of a coil carrying alternating current. The coil may encircle the part, maybe in the form of a probe, or in the case of tubular shapes, maybe wound to fit inside a tube or pipe. An eddy current in the metal specimen also sets up its own magnetic field which opposes the original magnetic field. The impedance of the exciting coil, or of a second coil coupled to the first, in close proximity to the specimen, is affected by the presence of the induced eddy currents. This second coil is often used as a convenience and is called sensing or pick up coil. The path of the eddy current is distorted by the presence of a discontinuity. A crack both diverts and crowds eddy currents. In this manner, the apparent impedance of the coil is changed by the presence of the defect. This change can be measured and is used to give an indication of defects or differences in physical, chemical, and metallurgical structure. Subsurface discontinuities may also be detected, but the current falls off with depth.
Acoustic Emission Testing
Acoustic emission testing (AET) physical weld testing methods are currently considered supplementary to other nondestructive testing methods. They have been applied, however, during proof testing, recurrent inspections, service, and fabrication.
Acoustic emission testing consists of the detection of acoustic signals produced by plastic deformation or crack formation during loading. These signals are present in a wide frequency spectrum along with ambient noise from many other sources. Transducers, strategically placed on a structure, are activated by arriving signals. By suitable filtering methods, ambient noise in the composite signal is notably reduced. Any source of significant signals is plotted by triangulation based on the arrival times of these signals at the different transducers.
Ferrite Testing
Effects of Ferrite Content
Fully austenitic stainless steel weld deposits have a tendency to develop small fissures even under conditions of minimal restraint. These small fissures tend to be located transverse to the weld fusion line in weld passes and base metal that were reheated to near the melting point of the material by subsequent weld passes. Cracks are clearly injurious defects and cannot be tolerated. On the other hand, the effect of fissures on weldment performance is less clear, since these micro-fissures are quickly blurted by the very tough austenitic matrix. Fissured weld deposits have performed satisfactorily under very severe conditions. However, a tendency to form fissures generally goes hand-in-hand with a tendency for larger cracking, so it is often desirable to avoid fissure-sensitive weld metals.
The presence of a small fraction of the magnetic delta ferrite phase in an otherwise austenitic (nonmagnetic) weld deposit has an influence in the prevention of both centerline cracking and fissuring. The amount of delta ferrite in as-welded material is largely controlled by a balance in the weld metal composition between the ferrite-promoting elements (chromium, silicon, molybdenum, and columbium are the most common) and the austenite-promoting elements (nickel, manganese, carbon, and nitrogen are the most common). Excessive delta ferrite, however, can have adverse effects on weld metal properties. The greater the amount of delta ferrite, the lower will be the weld metal ductility and toughness. Delta ferrite is also preferentially attacked in a few corrosive environments, such as urea. In extended exposure to temperatures in the range of 900 to 1700°F (482 to 927°C), ferrite tends to transform in part to a brittle intermetallic compound that severely embrittles the weldment.
Portable ferrite indicators are designed for on-site use. Ferrite content of the weld deposit may be indicated in percent ferrite and may be bracketed between two values. This provides sufficient control in most applications where minimum ferrite content or a ferrite range is specified.