TIG welding (GTAW) is an effective and precise way to weld stainless steel. In fact, if you’re looking to have high-quality stainless steel welds, TIG welding is the best choice.
It’s a challenging process to learn, but with some practice, you’ll get the hang of it and, before long, will be laying down high-quality weld beads.
This article will outline what you need to get your stainless steel TIG welding project off the ground.
Understanding the Challenges of TIG Welding Stainless Steel
TIG welding is one of the most challenging welding processes to master. But that isn’t to say you shouldn’t use TIG welding for your next stainless steel project.
You just need to understand what challenges await you. Once you mastered TIG welding stainless steel, you can create beautiful-looking welds.
Technique
TIG welding requires more of your attention compared to other welding processes.
All you need to do in MIG welding (GMAW) is control the gun angle and travel speed. However, in TIG welding, you must control the amperage, the filler metal, travel speed, torch angle, and arc length.
Getting the muscle memory you’ll need to make TIG welding easier takes practice. I spent many hours practicing before I could weld without thinking about all the variables I needed to control.
It’ll be discouraging initially, but if you stick with it, you’ll succeed.
Distortion & Heat
You’re in direct control of how much heat you put into the base metals. Since TIG welding is slower than MIG, you are putting more heat into the base metal.
The extra heat will cause more distortion and other heat-related issues.
Cost
The cost of the equipment, consumables, and materials is another challenge of TIG welding. The welding machine alone will be more expensive than a MIG or stick welding machine.
Then there are tungstens, gas, filler rod, gas lenses, cups, and collets. These items wear out. In most cases, you’ll need several sets to suit different tungsten diameters.
Types of Stainless Steel for TIG Welding
Stainless steel has many types and grades, determined by its alloying elements. There are three main types you’ll most likely come across are:
- Austenitic – Austenitic stainless steel is most appropriate for most GTAW projects and also the most common type you’ll encounter. It’s known to contain chromium, nickel, manganese, or molybdenum. Austenitic also has excellent corrosion resistance and weldability. Popular grades include 304, 310, and 316. Either has good weldability, but 304 is usually the more affordable option.
- Ferritic – Ferritic stainless steels have a lower nickel content, making them more affordable. Yet, the presence of more chromium and molybdenum improves their toughness. Unlike austenitic stainless, ferritic stainless steels are magnetic. Some common grades are 409, 430, and 444.
- Martensitic – This type of stainless steel is the least common. It works best for applications with a tempered and hardened edge. You probably TIG weld martensitic stainless steel, ever. That’s how rare it is. Some common grades are 410, 420, and 440A.
Other less common types you may come across are duplex and precipitation hardening.
| Family | Weldability | Ductility | High Temp Resistance | Common Grades |
|---|---|---|---|---|
| Austenitic | High | High | High | 304, 310, 316 |
| Ferritic | Low | Medium | High | 430 |
| Martensitic | Low | Low | Low | 410, 420 |
| Duplex | High | Low | Low | 2205 |
| Precipitation Hardening | Low | Medium | Low | 630 |
Preparing To TIG Weld Stainless Steel
The first step of any welding process is properly setting up the machine and the material.
If you don’t take the time to prepare your machine with the right consumables and settings, you’ll find nothing but frustration and guaranteed failure.
Choosing & Setting Up Your Tungsten Electrode
The heart of the TIG welding torch is the tungsten. Through this, the current finds its way to the base metal and creates the arc, which will melt the metal and the filler metal.
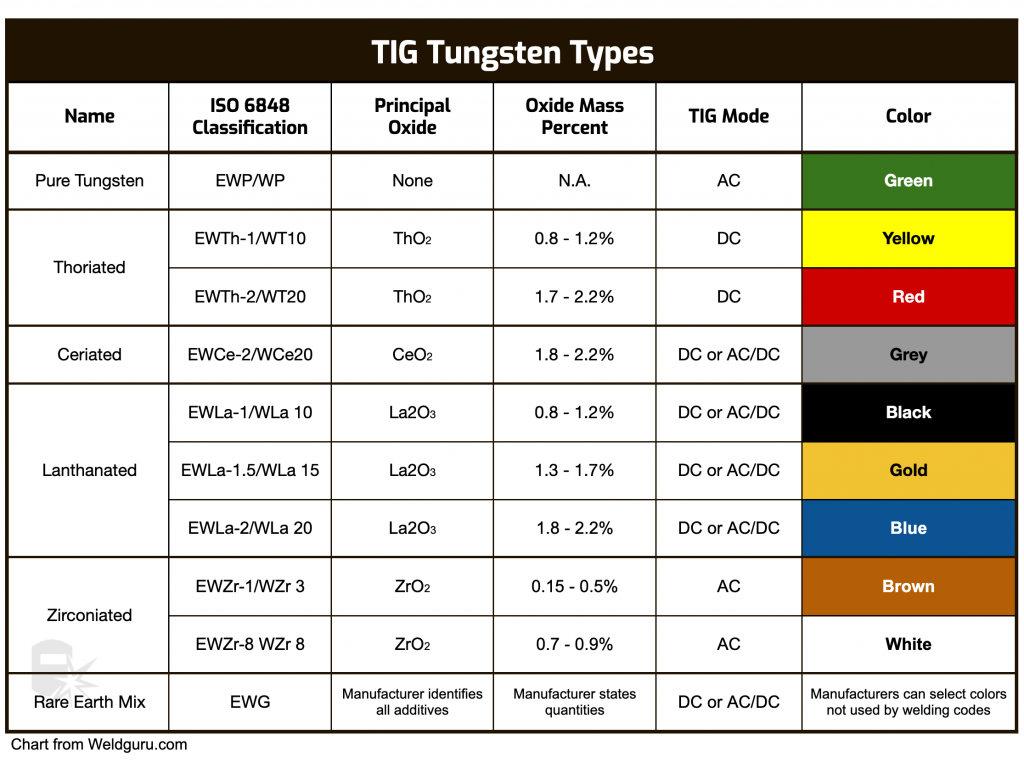
The three main tungsten electrodes for TIG welding for stainless steel are thoriated, ceriated, and lanthanated.
© weldguru.com – Image usage rights
Thoriated
Thoriated electrodes (red and yellow) contain either 1 or 2% thorium oxide. Adding thorium oxide makes the electrode more conductive and can handle higher temperatures.
As a result, these electrodes have better performance and last longer than pure tungsten. Thoriated electrodes have always been my choice for all my stainless steel TIG welding.
There is one drawback.
The thorium oxide in these electrodes is radioactive, and when you grind the tungsten tip, you’re creating this radioactive dust.
It is in a very small dose but there nonetheless. To combat this, always wear a respirator.
Ceriated
Ceriated electrodes (grey) have added cerium oxide in the 1 to 2% range. As a result, ceriated electrodes start and maintain an arc easier and have a better current-carrying capacity.
They also will be less likely to contaminate the weld puddle with tungsten particles.
You’d choose a Ceriated electrode over thoriated because they don’t have health risks due to thorium’s radioactive dust.
Also, ceriated electrodes still have excellent arc starting and stability and last long.
Lanthanated
Lanthanated electrodes (black, gold and blue) have 1 or 2% lanthanum oxide added. The addition of lanthanum oxide gives these electrodes better current carrying capacity.
They’re also easier to start an arc than pure tungsten.
Like ceriated electrodes, they’re non-radioactive and do not have the health risks of thoriated.
Lanthanated electrodes also have good arc starting and stability while also being long-lasting. They also have less tungsten consumption than either ceriated or thoriated.
Preparing the Tungsten
© weldguru.com – Image usage rights
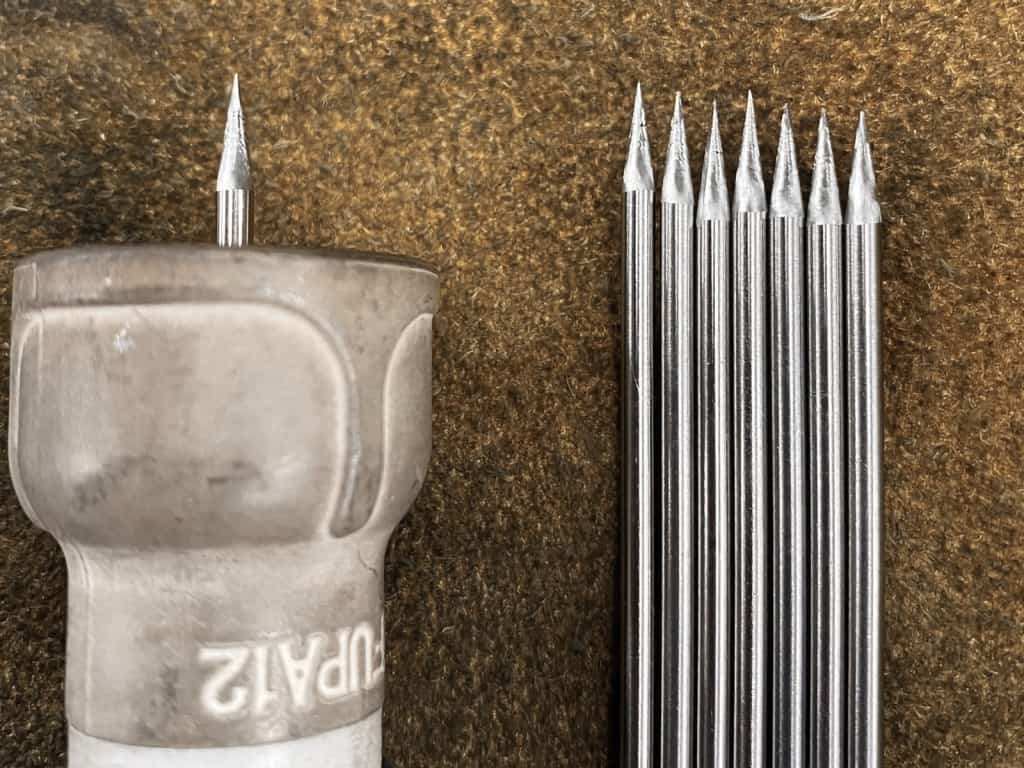
After you’ve selected your electrode, you’ll need to grind the end to a point. You will see that one end has colored paint on it, do not grind this end.
The color will tell you what type of electrode it is, and if you grind that end, you’ll be unable to identify the electrode.
You have two options to sharpen your tungsten electrodes:
- Using a bench grinder: These will work just fine if you have one in your workshop.
- Using a tungsten sharpener: You can buy these as a dedicated tool (similar to a Dremel tool), or if you have a rotary tool, you can buy an attachment. This will sharpen the end of your electrode to a uniform taper every time. Tungsten sharpeners use a small diamond grinding wheel and set angle guides to sharpen the tungsten to a point – handy!
To profile the electrode, grind the end to a point with a taper no more than 2.5 times the electrode diameter. After grinding, wipe the electrode to remove any dust or grime.
Whenever you see contamination on the electrode or the point is dull, re-sharpen it.
Choosing the Right Gas
Shielding gas is critical in many welding processes, but this is especially true in GTAW.
Stainless steel must be well protected from oxygen during welding, and your choice of shielding gas is an important consideration.
Most welders use 100% argon when TIG welding stainless steel. While this is a good choice, other options are worth considering.
- Argon/helium mix – will improve penetration and increase the heat input. This is a good choice for heavier plates or faster welding speeds.
- Argon/hydrogen mix – also improves the penetration and adds more heat input. It also has the advantage of a more significant cleaning action of the weld. This is a good choice for when you want your welds to look nice.
When setting the flow rate, you don’t want it to be too high because it will cause turbulence around the arc. This turbulence will contaminate your weld by bringing atmospheric gases into your weld puddle.
A flow rate of 15 to 35 cubic feet per hour is a good range.
For most TIG welding, 100% argon will serve you fine. In my two decades of TIG welding, I’ve only used other shielding gas a handful of times for specific projects.
Selecting the Right Filler Metal
The filler metal used in TIG welding is long rods of metal that you dip into the weld puddle adding material to the weld. When choosing filler metal, it must match the base metal.
There are a lot of charts and calculators available online, but if you’re welding common austenitic stainless, the three main filler rods you’ll need are:
- 308L – Used to weld 304 stainless steel but is also good for most 200 and 300-series stainless.
- 316L – Used on 316 stainless steel to maintain the properties of the base metal within the weld metal.
- 309L – Used to join stainless steel to mild steel.
The filler rods will also come in various diameters. You’ll choose a filler rod with a diameter slightly smaller than the thickness of the material you’re welding.
| Metal Thickness (inches) | Filler Rod Diameter (inches) |
|---|---|
| 1/16 | 0.045 or 1/16 |
| 3/32 | 1/16 or 3/32 |
| 1/8 | 1/16 or 3/32 |
| 3/16 | 1/8 |
| 1/4 | 3/16 |
| 1/2 | 1/4 |
Power Source and Polarity
© weldguru.com – Image usage rights
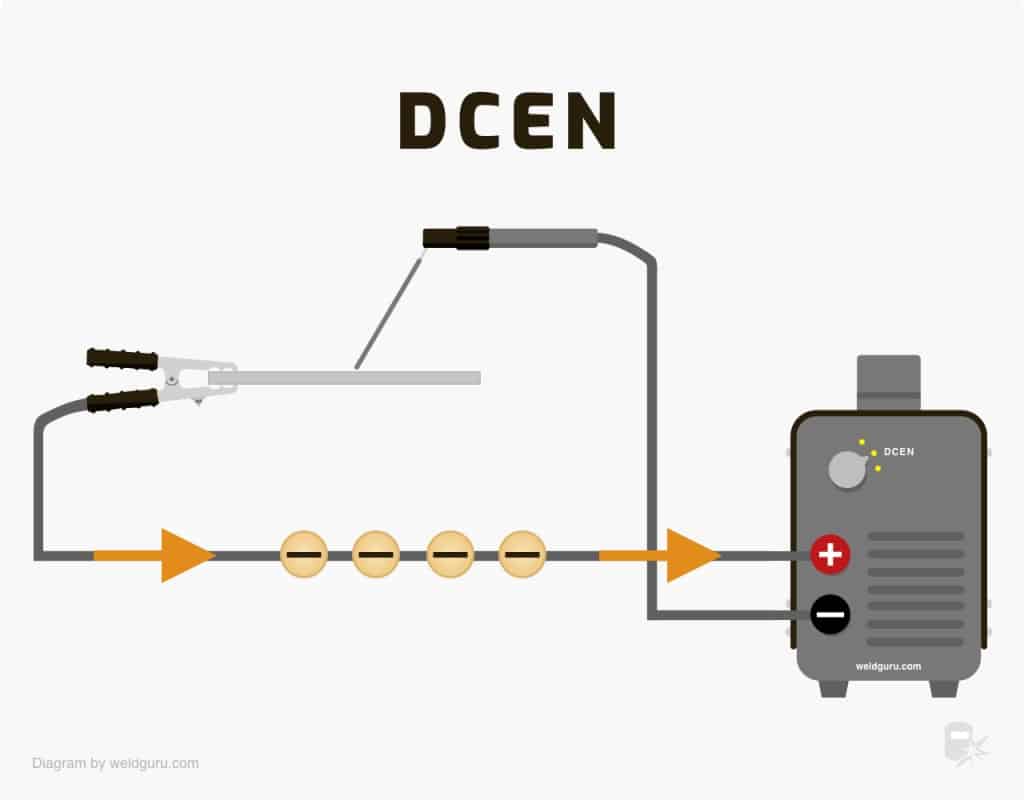
Stainless steel TIG welding requires a constant current DC machine using electrode negative (DCEN).
Adjusting Your Amperage Settings
When adjusting the amperage settings, always set it to the lowest, giving you a good weld with good fusion but not excessive heat.
If your machine has a foot pedal for amperage control, you’ll have the luxury of not being too concerned about the setting on the machine.
Set it so you have enough current available, and use the foot pedal for the fine-tuning.
Use A TIG Gas Lens for Improved Gas Coverage
© weldguru.com – Image usage rights
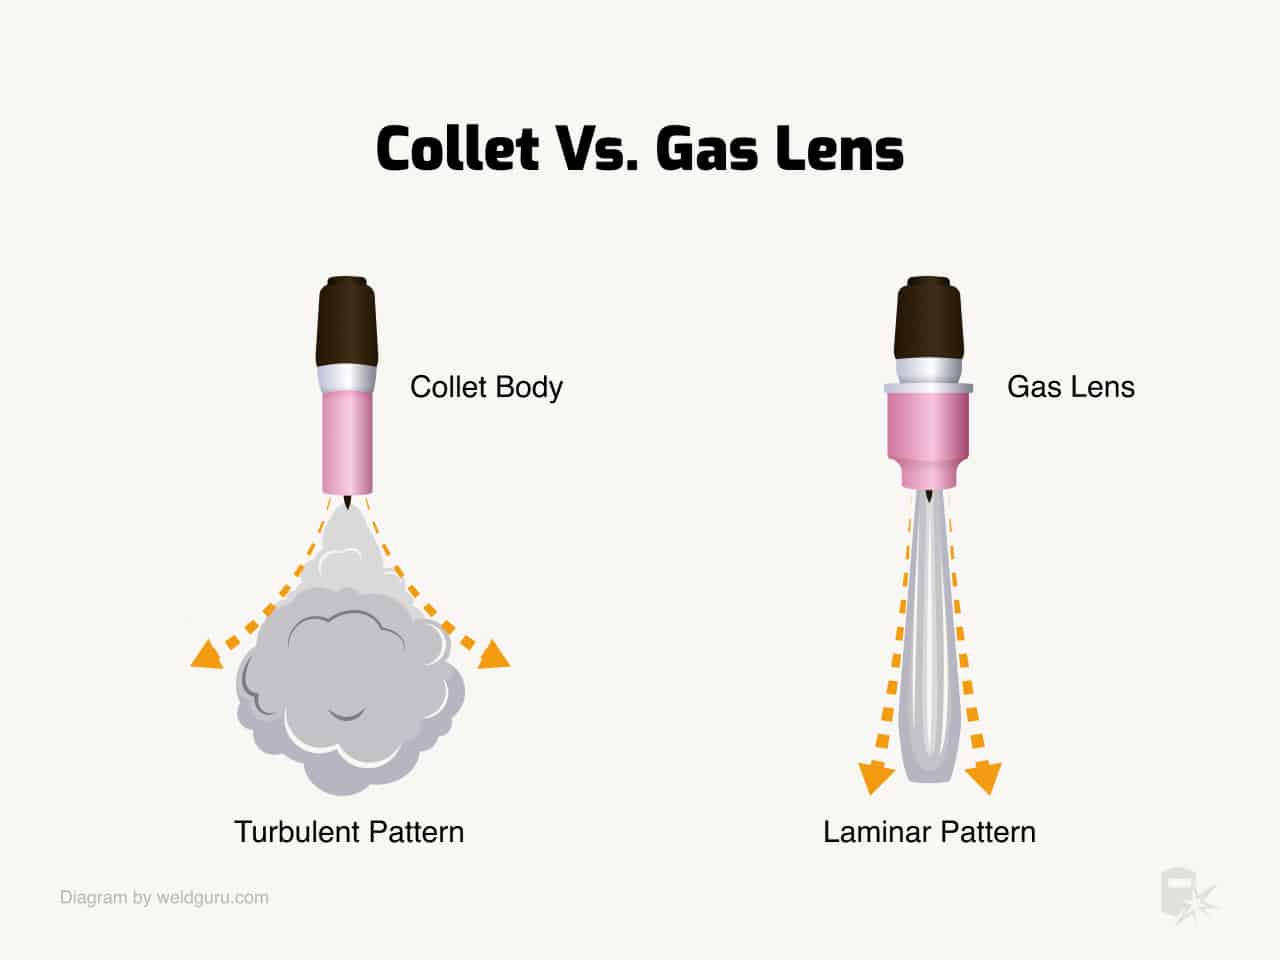
When you buy a TIG welding machine, the torch will come with a gas diffuser and collet that holds the electrode.
This setup will be fine for many applications, but if you want higher-quality welds with a better appearance, you’ll want to invest in a gas lens kit (like this).
A gas lens is a series of screens that filter the shielding gas delivering it in a stable and predictable flow, called laminar gas flow. It’ll direct the gas flow toward the weld puddle with less turbulence, better protecting your puddle and giving you a better weld.
It took many years before I worked at a shop that used gas lenses, the difference was night and day. My welds using a gas lens looked nicer, and the arc was more stable and easier to control.
Preparing The Metal Surface
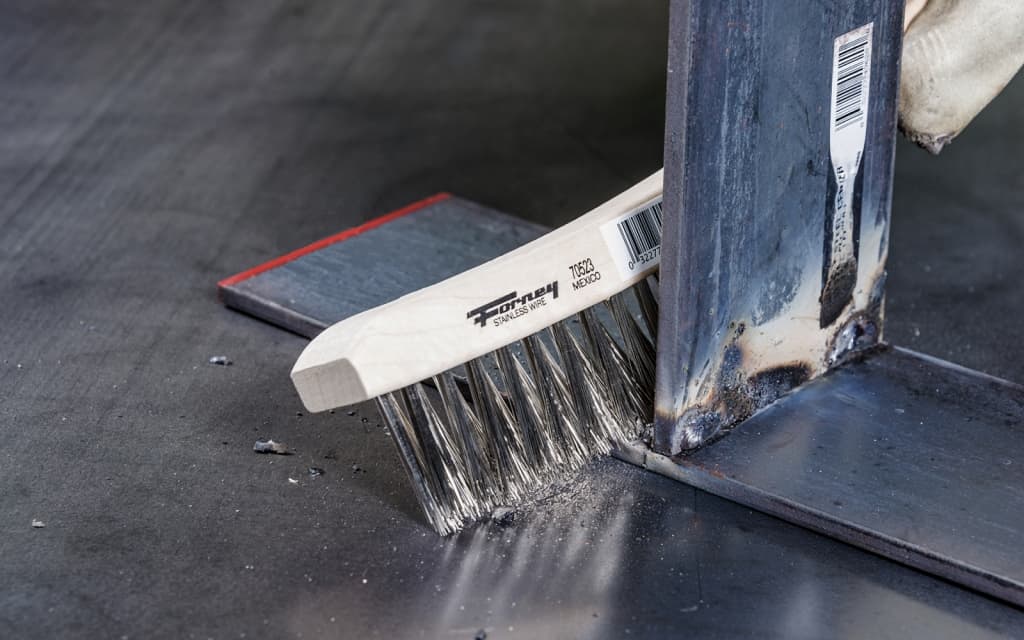
Preparing the base metals for welding is a critical aspect of the process that you must always pay attention to.
Any contamination of the base metals will show up in your weld because TIG welding is unforgiving to contamination.
Therefore you should have tools, such as a wire brush, dedicated to stainless steel that should not be used with any other materials to avoid contamination
Start by blowing away any dust on the surface, then wiping down with a solvent that will leave no residue behind. Acetone is a good choice for this.
If the metal has excessive oxidation on the surface, you may need a wire brush to clean some of it off.
Tips & Techniques for TIG Welding Stainless Steel
Good technique and steady hands are critical to becoming a successful TIG welder.
You’ll learn many aspects of the welding technique through hours of practice, but there are some tips that will guide you on your way.
The Starting Method
There are two main methods of starting the arc, scratch start and high-frequency start.
Either of these methods will create an arc when TIG welding stainless steel, but as you’ll soon see, one is superior to the other.
© weldguru.com – Image usage rights
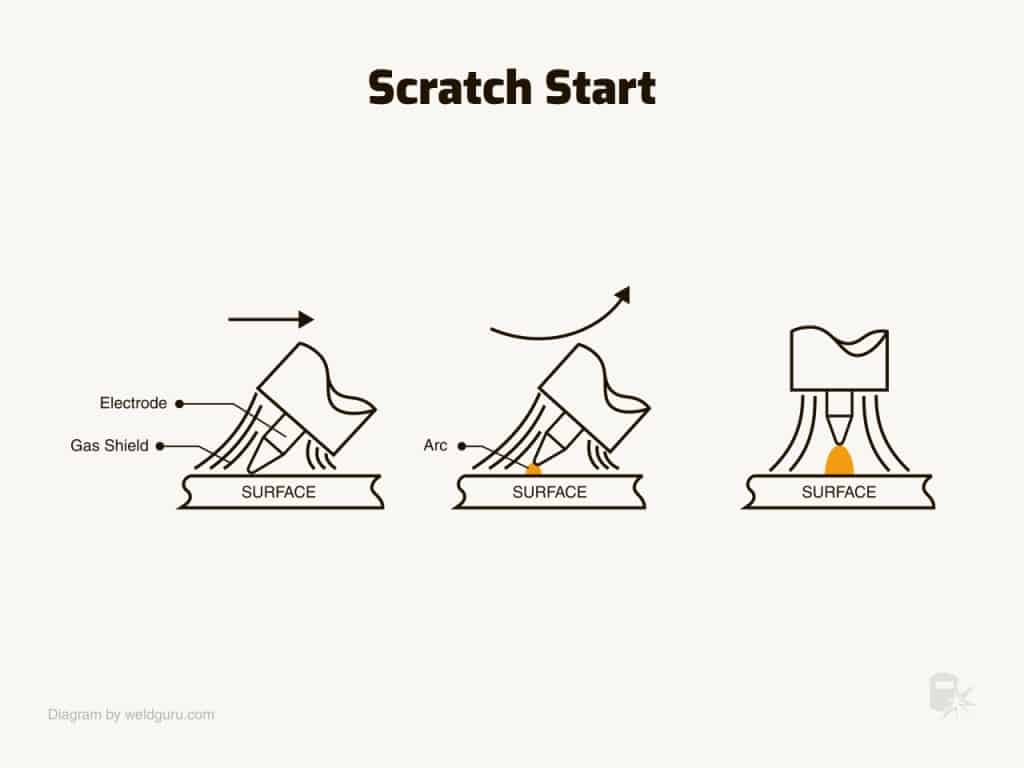
Scratch starting is where you touch the tungsten electrode tip to the base metal in a scratching motion. Many lower-cost TIG welding machines will have this as the only option for starting the arc.
The problem with scratch starting an arc is that you’re transferring some material from the tungsten to the base metal.
For many projects, this is not a big deal. But, if you want your welds to be of the highest quality, you risk tungsten inclusions inside your weld, which is a weld fault.
Read more: What is Scratch Start TIG? How & When To Use It
High-frequency start uses high-frequency current to ionize the air around the electrode. Weld current can then use this conductive path to the base metal to establish an arc.
All you need to do is hold the tungsten tip close enough to the base metal for the current to jump the gap and press the foot pedal.
The high-frequency start is superior to scratch start because the tungsten never touches the workpiece, totally avoiding weld contamination. Also, the formed arc is more stable and easier to control, making welding easier.
Controlling The Heat
If you want to weld stainless steel with minimal distortion, you’ll need to control heat input as you weld.
One way to do this is to use a foot pedal for amperage control. Think of it like a gas pedal.
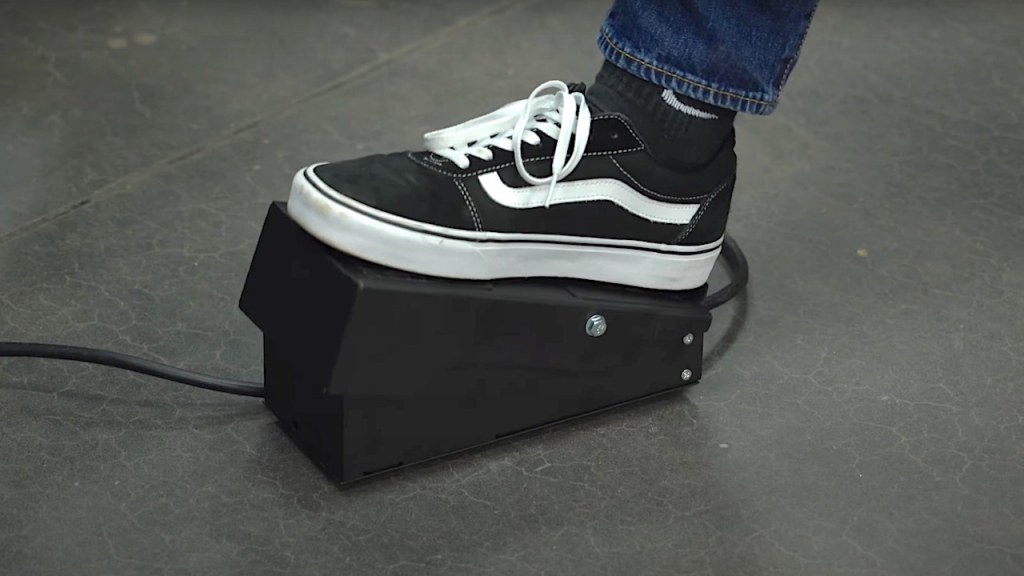
The more you press it down, the more amperage you deliver to the arc. I like using a foot pedal to lower or raise the amperage during the weld. Rocker-style foot pedals are the way to go, giving you easier precision control.
For welding machines that do not have a foot pedal, you will have to adjust your travel speed instead. As the material heats up, increase your travel speed to reduce the extra heat you put into the piece.
Adding more filler metal more frequently will also help cool your weld and parent metal.
Some TIG welding machines come with a pulse setting. Using a pulse means the machine will switch from a minimum to maximum amperage at an interval you set.
Also, pulse welding means that the arc is at full power for less time than if you were welding without it, resulting in lower heat input and easier control over the weld puddle.
Control Your Travel Speed
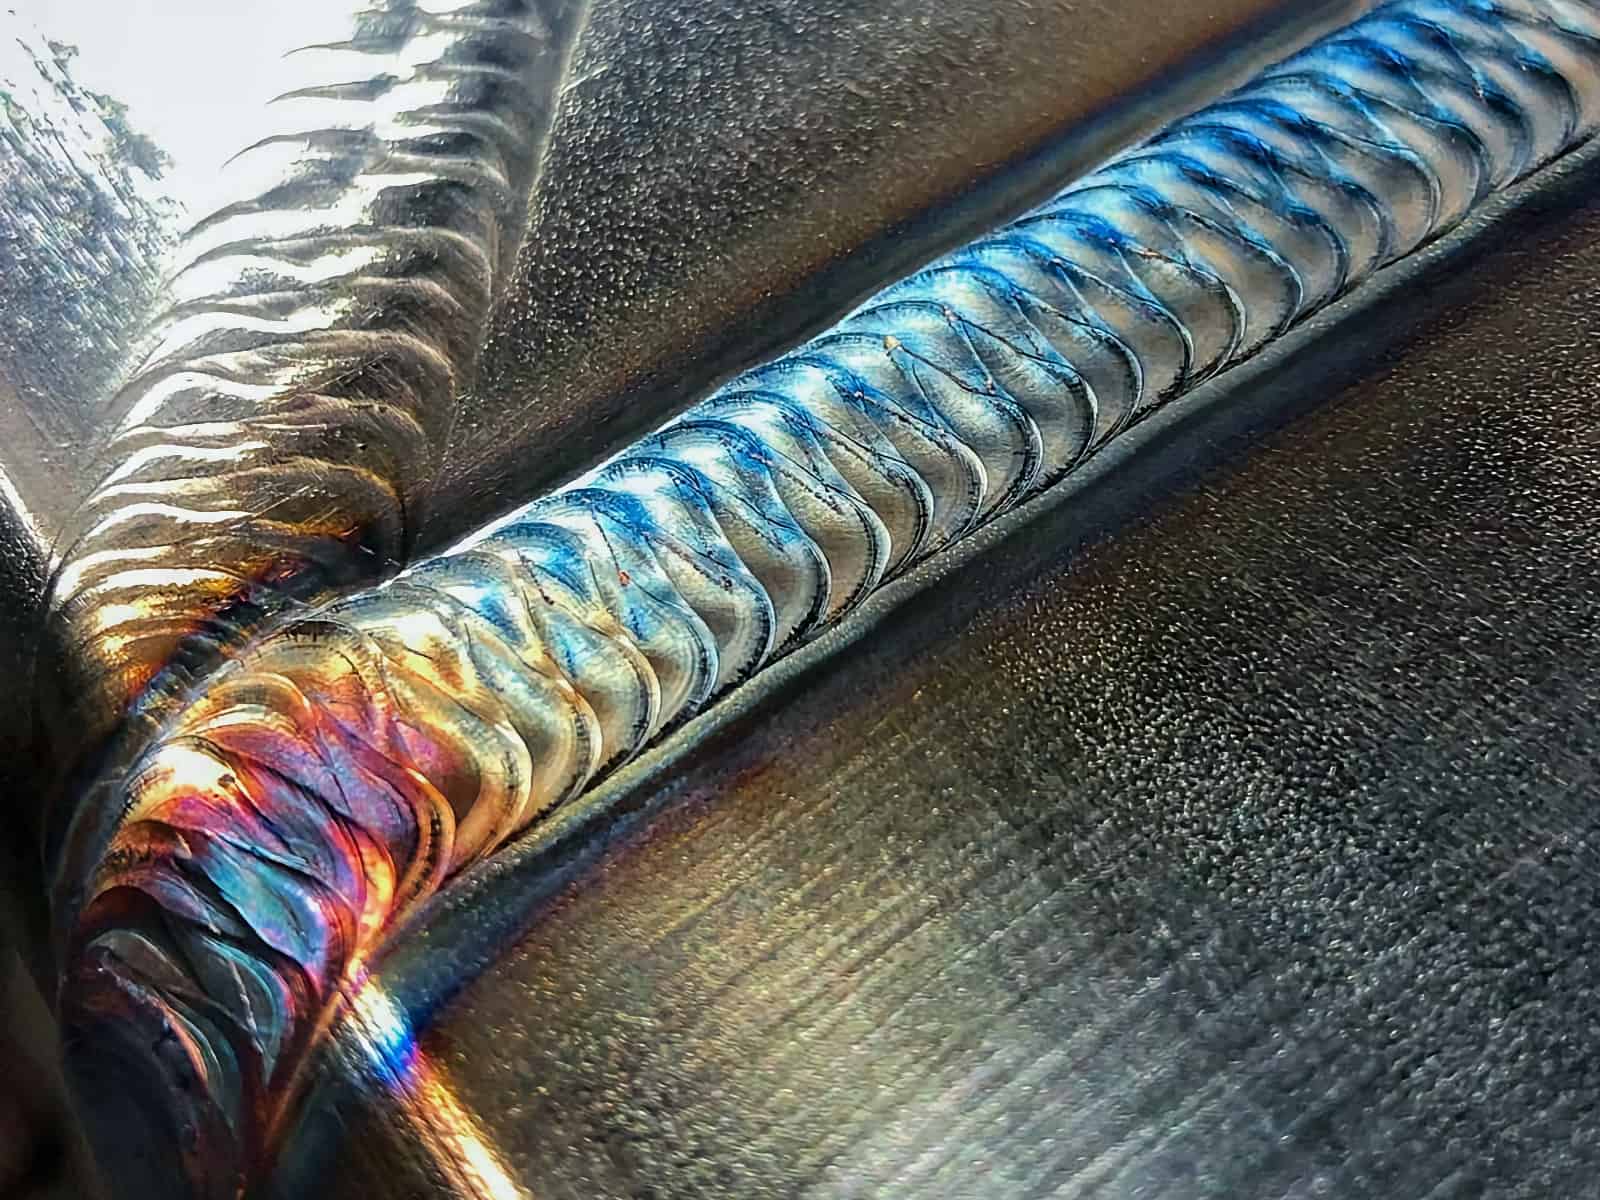
The thickness of the material and how large of a weld you’re trying to make, combined with your amperage, will dictate what your travel speed will be.
© weldguru.com – Image usage rights
If your travel speed varies, your weld varies in size, and the heat input is inconsistent. This causes unwanted distortion, overheating, and a weld that looks bad.
One way I maintain a uniform travel speed is to watch the size of the weld puddle. If the puddle gets smaller, I know I’m traveling too fast, and if the puddle becomes larger, I’m going too slow.
Use The Proper Torch Angle
The torch angle is more critical in TIG welding than in other welding processes.
Not only do you need to have proper gas coverage and arc length, but you also need to be able to dab the filler rod into the weld puddle.
Not to mention, be able to see what you’re doing!
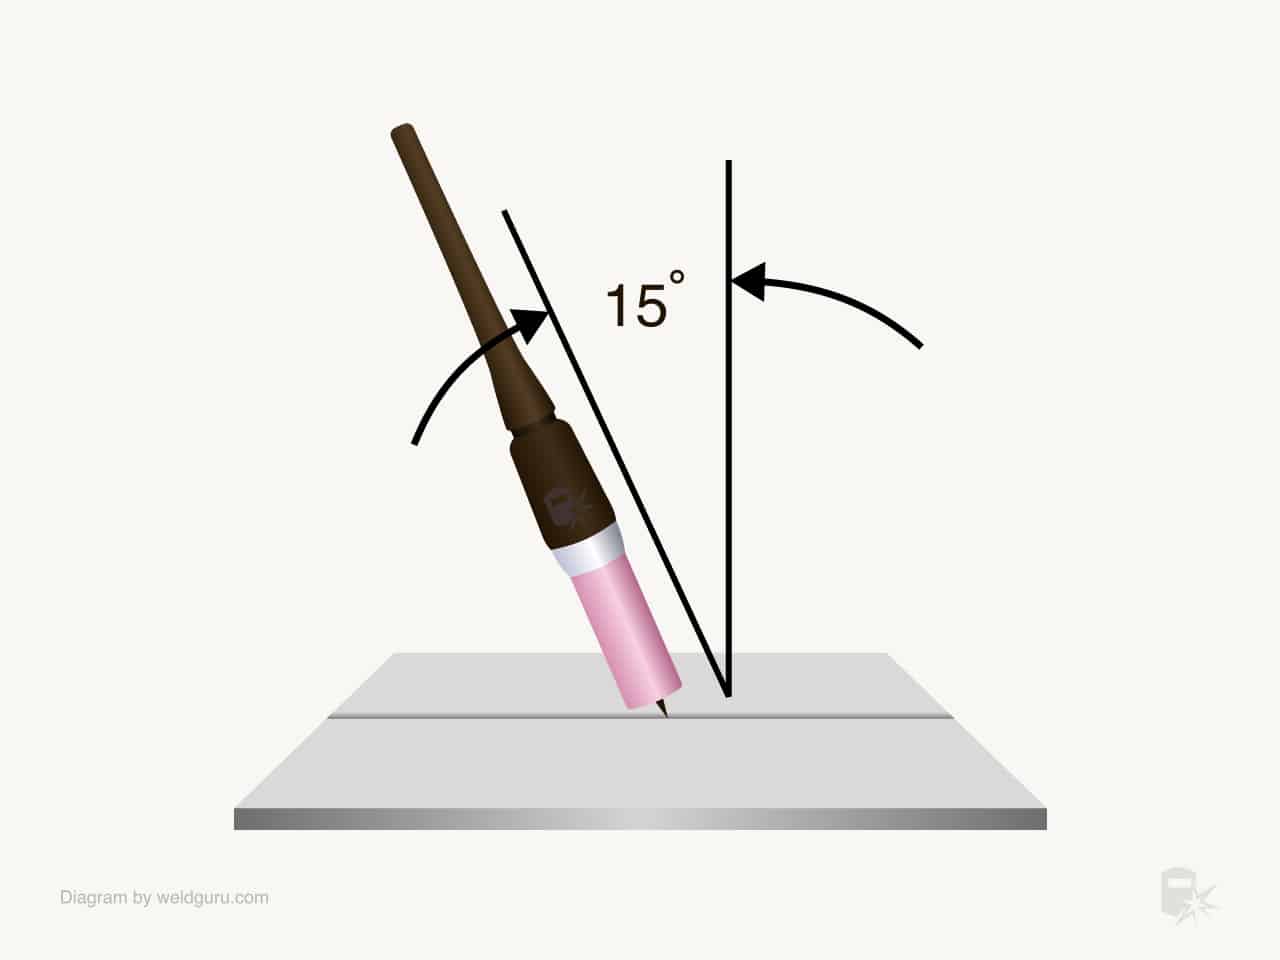
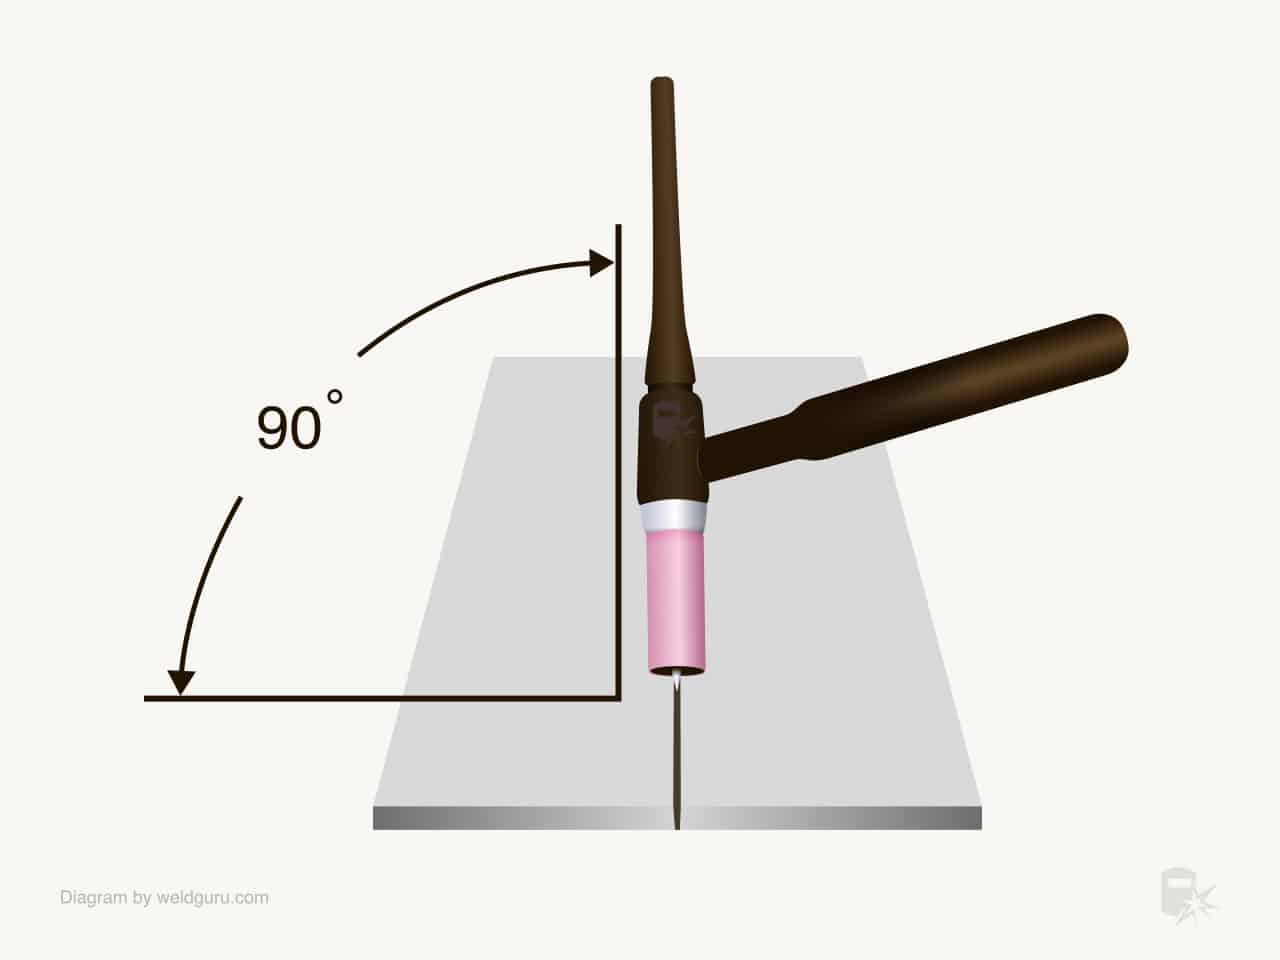
Generally speaking, the torch should be around 15 degrees off perpendicular, facing the direction of travel.
You can adjust to suit, but don’t go beyond 45 degrees, or you’ll lose some shielding gas coverage.
© weldguru.com – Image usage rights
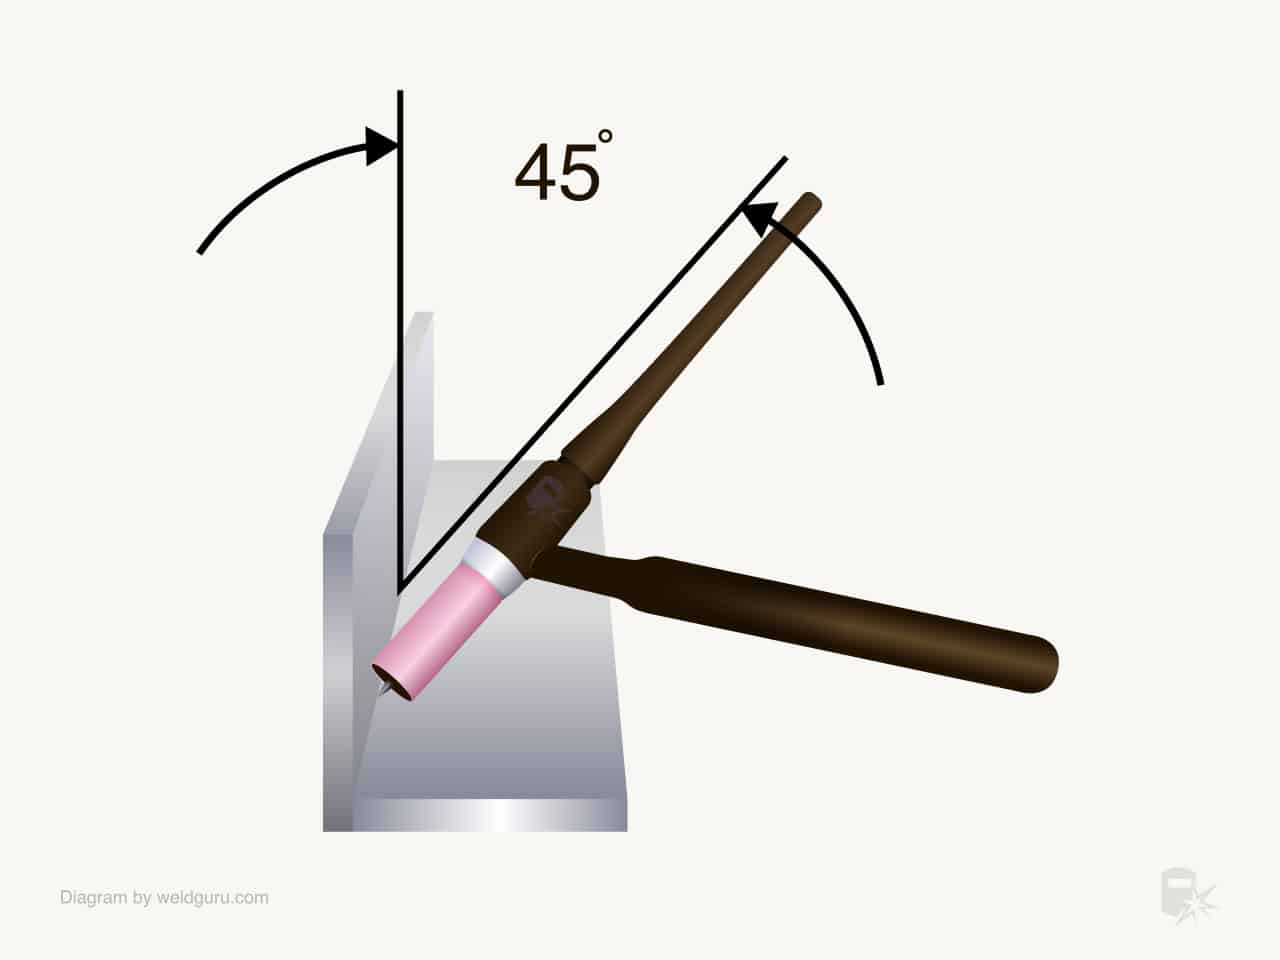
When welding a fillet weld, your torch should be 45 degrees in the joint to get an even weld size on both pieces of material.
© weldguru.com – Image usage rights
For butt welds, the torch will be 90 degrees to the joint, again to get an even weld size on both sides of the material being welded.
© weldguru.com – Image usage rights
Adjusting the angle of the torch will also affect the penetration and puddle size. The steeper the angle, the longer your puddle will get and the shallower the penetration.
The closer to 90 degrees the torch is, the narrower the puddle and the deeper the penetration.
Use Back purging for Contamination Prevention
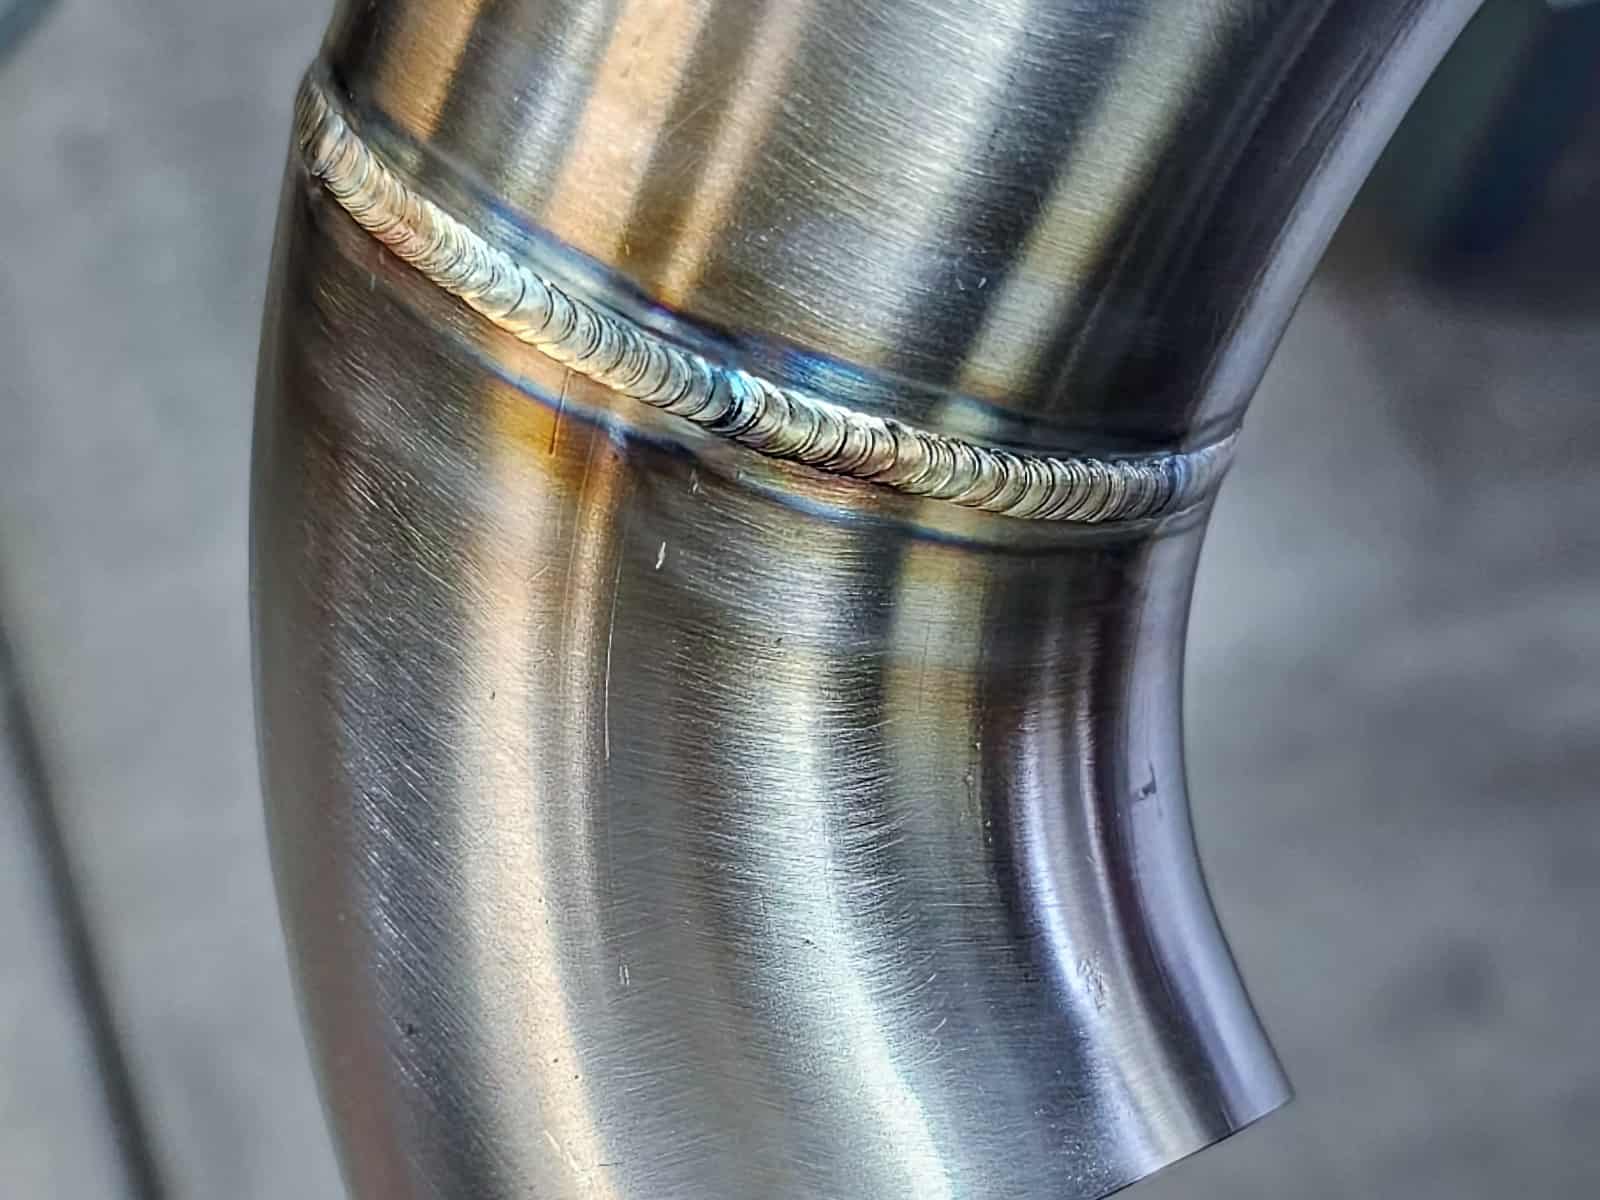
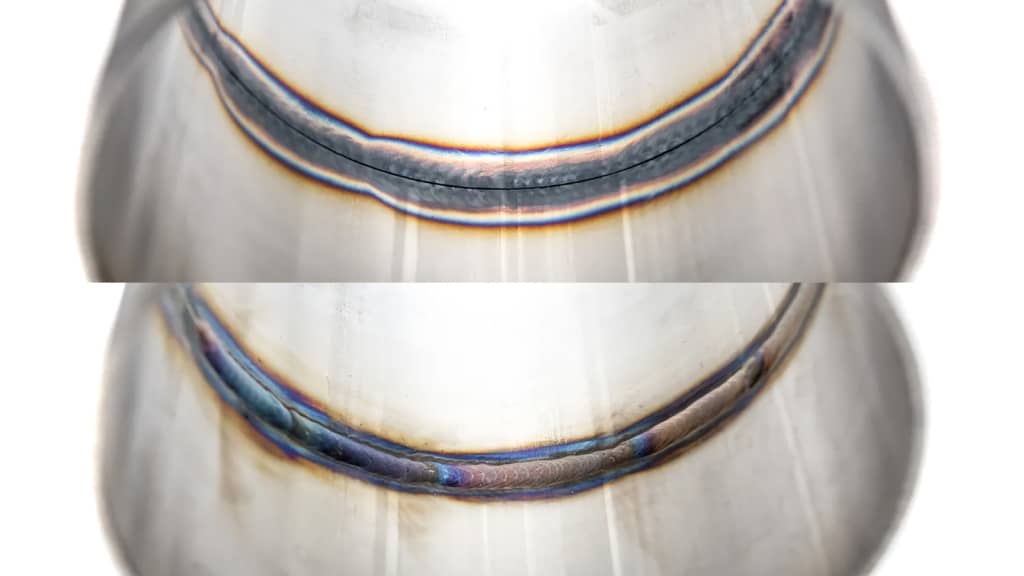
Sometimes, you must ensure that the fusion on the backside of a weld is free from contamination or oxidation. This is especially true when GTAW stainless pipe or thin material.
© weldguru.com – Image usage rights
To back purge a pipe, plug both ends and pump inert gas into the pipe through one of the ends. You’ll need a vent at the highest plug to allow the inert gas to escape.
For back purging weld joints, you’ll need to fabricate or buy a special back purge bar that will clamp on the back of the weld joint.
Inert gas flows into the purging bar and protects the back of the weld in inert gas through a series of holes.
Credit: https://soulpp.com/2019/09/17/tech-talk-back-purging-welds-what-and-why/
Or you can have another person with a hose running from a bottle of argon hold the open end over the back of the weld.
Use Pre and Post Shielding Gas Flow
Most TIG welding machines will have settings for pre and post-flow of the shielding gas.
The pre-flow floods the weld area with shielding gas in preparation for welding. While the post-flow continues, the shielding gas flow after the arc stops.
You’ll want a pre-flow of about one second and a post-flow of one second per 10 amps of welding current.
Stainless steel is more susceptible to oxidation when exposed to the atmosphere while hot. This is why post-flow is essential, as it lets the weld cool before exposure to oxygen.
It is critical to hold the torch cup over the end of the weld for around one second until the post-flow is complete.
There is no harm in using excessive post flow aside from wasting shielding gas. I usually set the pre-flow to one second and the post-flow to at least five seconds, regardless of the welding current settings.
Monitor Color Grading
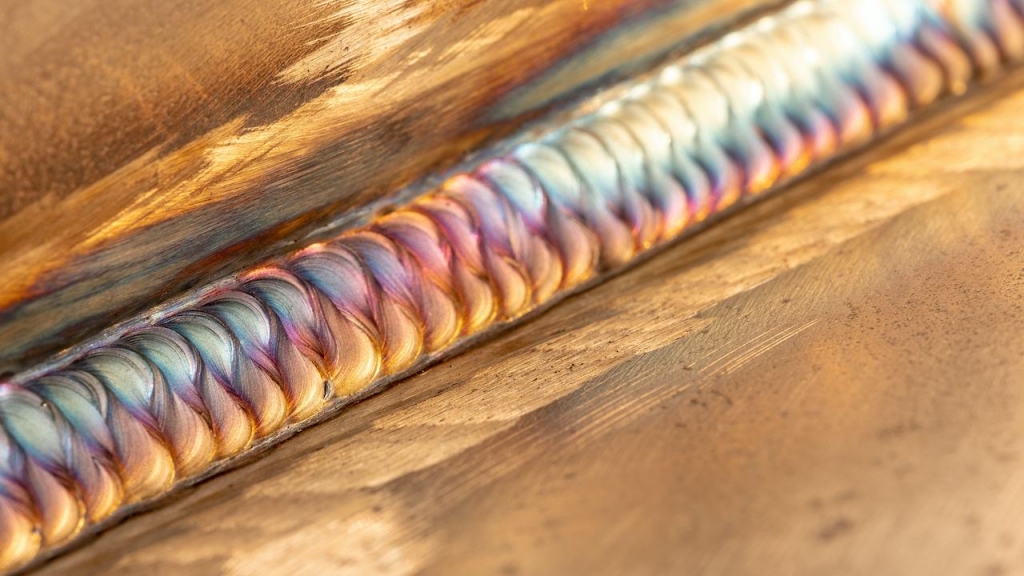
A neat feature of TIG welding stainless steel is the weld will take on many different colors, which tells how good the weld is.
Exposure of the heated weld metal to the atmosphere causes the weld to oxidize and change color.
The weld may have problems affecting its integrity depending on how much oxidation there is.
Several factors affect the color your weld takes on:
- Shielding gas coverage
- The angle of the torch
- Heat/Amperage
- Travel speed
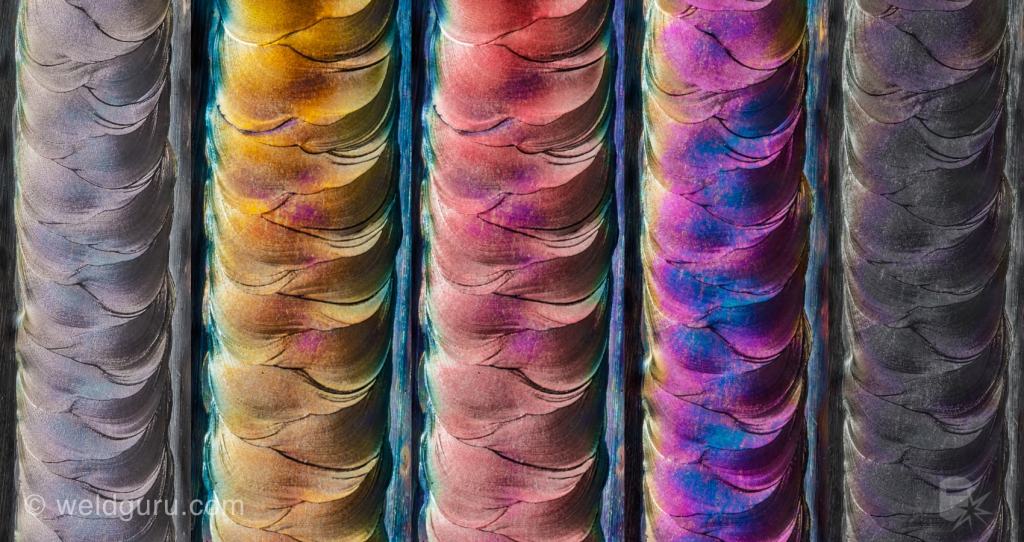
Each color profile will tell you a different story about what is happening with the weld.
© weldguru.com – Image usage rights
- No color – A weld that looks chrome or has no color is the most structurally sound because it has experienced no oxidation. Welds that look like this will have also retained their corrosion resistance.
- Yellow or Gold – Welds with a yellow, straw, or gold coloring have had minimal oxidation. These welds are still sound, so your weld is still acceptable if you see this color profile.
- Red – Seeing red in your weld means you’re welding too hot. As long as the weld is not critical, it will still be acceptable.
- Blue or Purple – When your weld exposes itself to the atmosphere while still very hot, it will look blue or purple. While these welds may be fine for non-critical work, turning the heat down is best.
- Black or dull gray – These welds are no longer stainless because you’ve baked the corrosion resistance out of them. Welds that look like this are no good.
Your goal is to keep the color to either gold or no color and keep this color throughout the weld.
Delivering a consistent color throughout will take practice and consistency, but with time becomes automatic.
Want more TIG tips? Read the 18 TIG Tips for Beginners here.
Preventing Distortion
Distortion is a major issue when welding stainless steel, regardless of the welding process.
When you are TIG welding, stainless steel distortion will be of particular concern, especially when welding thinner materials.
Stainless steel absorbs a lot of heat and holds it for a period of time longer than most other steels.
© weldguru.com – Image usage rights
The good news is that there are many things that you can do to fight distortion:
- Clamping the piece or using jigs and fixtures will hold the material in place and keep it flat until the weld has cooled. Doing this will not eliminate distortion but will help to keep it to a minimum.
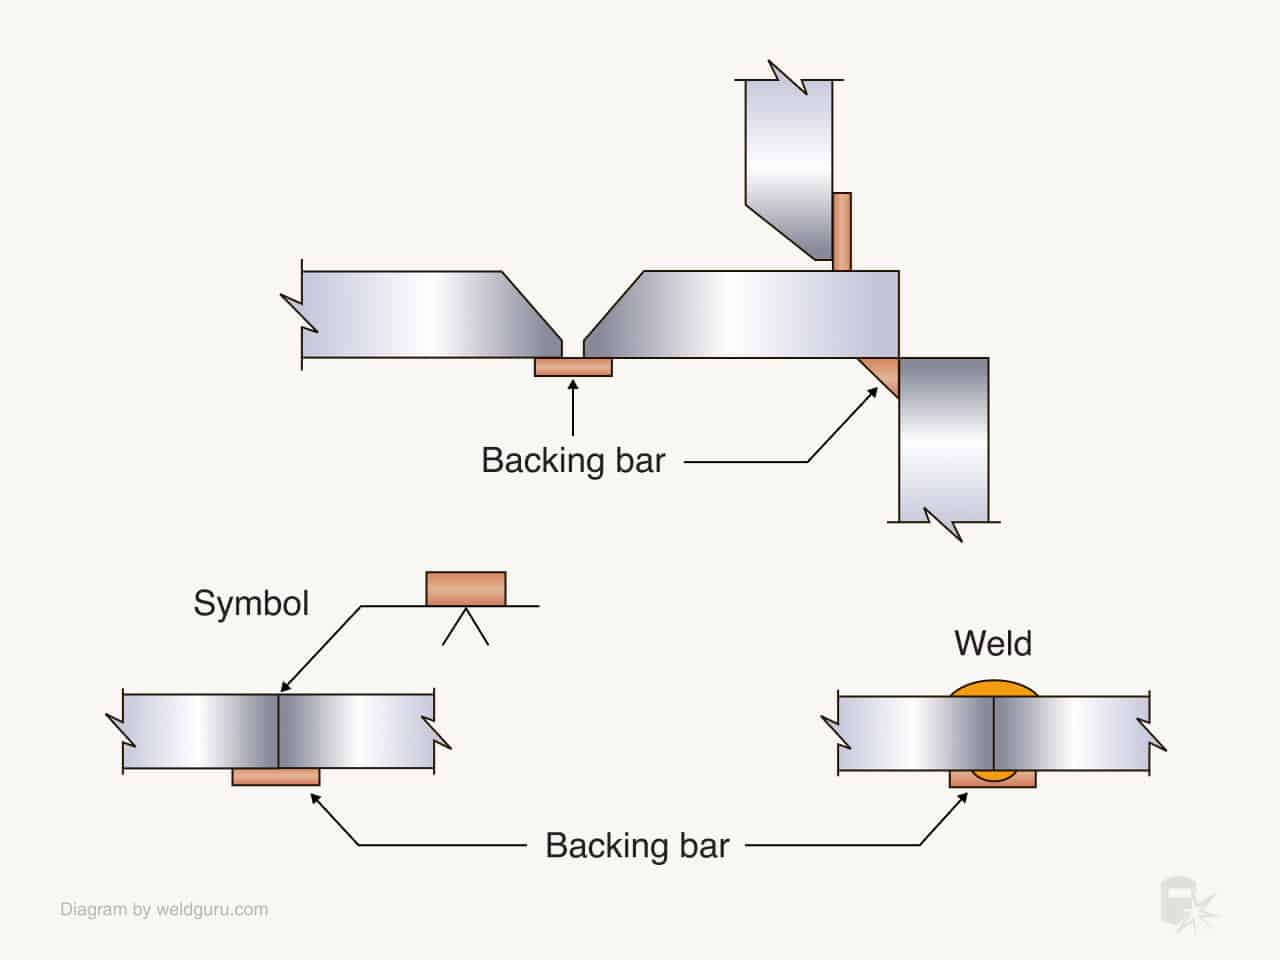
- Backing bars support the back side of the weld joint and are a heat sink, drawing some heat away from the weld area.
- Proper preparation of the weld joint is the first step in preventing distortion. You should fit the fabrication using enough tack welds to hold the joint together. If you tack the weld joint together securely, it’ll help reduce the distortion caused by the pieces of metal separating as they heat up.
- Stitch welding is a great way to distribute the heat around the weld joint. You can also backstep the welds to even out the heat you are putting into the weld area.
- Always use the lowest amperage possible to achieve a sound weld.
- Use pulse TIG if your machine has it. Using the pulse setting will minimize distortion.
Conclusion
TIG welding is a versatile and precise process worth learning, especially if you want to weld stainless steel.
Even though it’s challenging to master, with some practice, you will find that you can lay down high-quality weld beads that look amazing!
